Table of Contents
Infrastructure as Code (IaC)
Infrastructure as Code (IaC) is an approach in cloud computing that enables the automated management and provisioning of infrastructure resources through machine-readable scripts or code. IaC treats infrastructure components, such as servers, networks, and databases, as code, allowing developers and operations teams to define, deploy, and manage these resources more efficiently, consistently, and scalable.
Role of Terraform as a Leading IaC Tool
Terraform stands out as one of the leading IaC tools, developed by HashiCorp. It has gained widespread adoption and popularity due to its declarative syntax, extensive provider ecosystem, and versatility across various cloud providers and on-premises environments. Terraform enables users to define infrastructure resources using a simple and human-readable configuration language, HashiCorp Configuration Language (HCL). This language allows users to express the desired state of their infrastructure and Terraform takes care of orchestrating the necessary API calls to bring the actual infrastructure in line with the defined state.
Terraform
Terraform is an open-source Infrastructure as Code tool that lets you define both cloud and on-prem resources in human-readable configuration files that you can version, reuse, and share. You can then use a consistent workflow to provision and manage all your infrastructure throughout its lifecycle.
Key features
1. Declarative Configuration and Idempotent Operations
Terraform employs a declarative approach to configuration. Instead of specifying the sequence of steps to achieve a desired state, users declare the desired end-state of their infrastructure. This simplifies the configuration process, as users focus on specifying what they want the infrastructure to look like rather than how to achieve that state.
Terraform ensures idempotence, meaning that running the same configuration multiple times results in the same desired state. If the infrastructure is already in the specified state, terraform will recognize it and take no action.
2. Infrastructure as Code (IaC)
Terraform treats infrastructure components as code, allowing users to version control their configurations and manage them like software. This approach enhances collaboration, enables code reviews, and ensures that infrastructure changes are tracked, documented, and reproducible.
3. State Management
Terraform maintains a state file that keeps track of the current state of the infrastructure. This file records the mapping between the configured resources and the real resources in the cloud. State management is crucial for Terraform to understand the existing infrastructure and determine the necessary changes to achieve the desired state.
4. Multi-Cloud Support
Terraform is provider-agnostic and supports major cloud providers such as AWS, Azure, and Google Cloud, as well as other services like Kubernetes and on-premises solutions. This flexibility enables users to write infrastructure code once and deploy it across different cloud platforms or hybrid environments.
5. Resource Graph
Terraform creates a resource graph based on the declared dependencies between resources. This graph helps Terraform understand the order in which resources should be created or modified, ensuring that dependencies are resolved correctly during the provisioning process.
Getting started with Terraform
Step 1: Installing Terraform
- Download Terraform: Visit the official Terraform website (https://www.terraform.io/) and navigate to the “Downloads” section. Download the appropriate version of Terraform for your operating system (Windows, macOS, or Linux).
- Install Terraform: Follow the installation instructions for your specific operating system. For example, on Linux or macOS, you might extract the downloaded ZIP file and move the terraform binary to a directory included in your system’s PATH. On Windows, you can extract the ZIP file and add the directory to your system’s PATH.
- Verify Installation: Open a terminal or command prompt and run the following command to verify the installation:
terraform version
Step 2: Creating a Simple Web Server
This project uses Terraform to create a simple web server with a configurable port.
- Create a Working Directory: Choose or create a directory for your Terraform configuration files. Navigate to this directory in your terminal or command prompt.
- Create a Terraform Configuration File (e.g., main.tf): Create a file named main.tf and add the following content to define the web server.
					provider "local" {
  # Use the local provider for running local-exec provisioner
}
resource "null_resource" "webserver" {
  provisioner "local-exec" {
    command = "python3 -m http.server ${var.port}"
  }
}
variable "port" {
  description = "Port on which the web server will run"
  type        = number
  default     = 8080
}
output "webserver_ip" {
  value = "127.0.0.1"
}
- Initialize Terraform: Run the following command to initialize Terraform in your working directory:
terraform init
- Review and Apply Changes: Run the following command to review the planned changes and apply them:
terraform apply
- Confirm Changes: Terraform will display the changes to be made. Type yes and press Enter to confirm the changes.
- Verify Resource Creation: After the apply process completes, you can check your AWS account to verify that the S3 bucket has been created.
Importance of the Terraform State File
The Terraform state file (terraform.tfstate) is crucial for managing the state of your infrastructure. Here’s why it’s important:
- State Tracking: The state file maintains a record of the current state of your infrastructure. It includes details such as resource IDs, configurations, and dependencies. This information is vital for Terraform to understand what resources are currently deployed.
- Idempotent Operations: Terraform uses the state file to ensure idempotent operations. It tracks the state of resources and only makes changes necessary to bring the infrastructure to the desired state. This prevents unnecessary modifications and ensures consistency.
- Concurrency and Collaboration: The state file facilitates collaboration among team members. It allows multiple users to work on the same infrastructure by providing a shared understanding of the current state. Terraform uses a locking mechanism to prevent conflicts during concurrent operations.
- Resource Graph: The state file is used to build a resource graph that represents the relationships and dependencies between resources. This graph helps Terraform determine the correct order for creating, updating, or destroying resources.
- Remote State Storage: In a team environment, it’s common to store the state file remotely, using a backend like AWS S3 or HashiCorp Consul. Remote state storage enhances security, enables collaboration, and ensures that the state is accessible to all team members.
It’s important to manage the state file carefully, and in a collaborative environment, using remote state storage with proper access controls is recommended to ensure the integrity and security of your infrastructure configurations.
Terraform modules
Concept of Terraform Modules
Terraform modules are a fundamental concept that allows you to encapsulate and reuse infrastructure code in a modular fashion. A module is a collection of Terraform configuration files organized together in a directory. It serves as a building block for defining and provisioning a specific piece of infrastructure. Modules promote code reuse, simplify configuration management, and enhance collaboration among teams.
Module directory structure
main_configuration/
|– main.tf
|– modules/
| |– web_server/
| |– main.tf
| |– variables.tf
| |– outputs.tf
|– variables.tf
Nested Modules
Nested modules occur when you use one module within the context of another module. This allows you to compose complex infrastructures by assembling smaller, reusable components. Each module can be a standalone unit or include other modules, forming a nested structure.
Multi-module Directory structure
main_configuration/
|– main.tf
|– modules/
| |– web_server/
| |– main.tf
| |– variables.tf
| |– outputs.tf
| |– database/
| |– main.tf
| |– variables.tf
| |– outputs.tf
|– variables.tf
Creating and Using a Custom Terraform Module: Practical Example
Let’s create a simple Terraform module that sets up a basic web server using a local provider.
Step 1: Create a Module Directory
Create a directory named web_server_module for your module. Inside this directory, create a file named main.tf with the following content:
					# web_server_module/main.tf

variable "web_server_port" {
  description = "The port on which the web server will listen"
  default     = 8080
}

resource "null_resource" "web_server" {
  provisioner "local-exec" {
    command = "python3 -m http.server ${var.web_server_port}"
  }
}
This module uses a null_resource along with the local-exec provisioner to execute a local Python HTTP server. The web_server_port variable allows customization of the port.
Step 2: Create a Main Configuration
Now, create a directory for your main configuration. In this example, let’s create a file named main.tf with the following content:
					# main.tf

module "example_web_server" {
  source            = "./web_server_module"
  web_server_port   = 8081  # Customize the port if needed
}
In the main configuration, we use the module block to instantiate our custom web server module. The source parameter points to the local directory containing the module.
Step 3: Initialize and Apply
- Open a terminal in the directory containing your main configuration (tf).
- Run the following command to initialize Terraform and prepare the configuration:
terraform init
- Run the following command to apply the configuration:
terraform apply
- Type yes when prompted to confirm the changes.
Step 4: Verify the Web Server
After the apply process completes, open a web browser, and navigate to http://localhost:8081 (or the port you specified). You should see the default Python HTTP server page, indicating that the local web server is running.
Benefits of Terraform Modules for Local Resources
- Consistency and Reusability: Modules provide a consistent way to define and reuse infrastructure components, even for local resources. This consistency is valuable for managing various parts of your infrastructure.
- Customization: Variables in modules allow users to customize the behavior of the module. In this example, the web_server_port variable enables users to specify the port on which the local web server listens.
- Separation of Concerns: Modules encapsulate the details of the infrastructure, abstracting the complexity. This separation of concerns makes it easier to understand and maintain the code.
- Scalability: By organizing infrastructure code into modules, you can scale your configuration as needed. Modules can be reused in multiple configurations, promoting efficiency, and reducing redundancy.
While this example uses a local provider for simplicity, in real-world scenarios, you might substitute this with resources from cloud providers or other external systems when needed. The key is to leverage Terraform’s modular approach for creating flexible and maintainable infrastructure configurations.
Managing Variables and Outputs
Use of Variables in Terraform
In Terraform, variables are used to parameterize configurations and make them more flexible and reusable. They allow you to define values that can be customized when applying your Terraform configuration. Variables can be defined at different scopes, such as at the root module level or within individual modules.
Defining Variables
					# variables.tf

variable "web_server_port" {
  description = "Port on which the web server will listen"
  type        = number
  default     = 8080
}

variable "web_server_directory" {
  description = "Directory to serve as the web root"
  type        = string
  default     = "www"
}
Using Variables in Web Server Module
					# web_server_module/main.tf

variable "web_server_port" {
  description = "Port on which the web server will listen"
  type        = number
}

variable "web_server_directory" {
  description = "Directory to serve as the web root"
  type        = string
}

resource "null_resource" "web_server" {
  provisioner "local-exec" {
  command = "python3 -m http.server ${var.web_server_port} -d ${var.web_server_directory}"
  }
}
In this modified web server module, variables are introduced for the web server port and the web root directory. The variables are then used in the local-exec.
Defining and Using Outputs in Terraform
Outputs in Terraform allow you to expose information from your configuration, making it accessible to other configurations or external systems. Outputs are useful for sharing data between Terraform modules or for obtaining values generated during the apply process.
Defining Outputs for the Web Server Module
					# web_server_module/outputs.tf

output "web_server_public_ip" {
  description = "Public IP address of the web server"
  value       = null_resource.web_server.*.triggers.ip
}

output "web_server_directory" {
  description = "Directory served as the web root"
  value       = var.web_server_directory
}
In this example, two outputs are defined in the outputs.tf file of the web_server_module. The web_server_public_ip output captures the IP address of the web server, and the web_server_directory output exposes the directory served as the web root.
Using Outputs in Main Configuration
					# main.tf

module "example_web_server" {
  source                = "./web_server_module"
  web_server_port       = 8081  # Customize the port if needed
  web_server_directory  = "my_website"
}

output "example_web_server_ip" {
  description = "Public IP address of the example web server"
  value       = module.example_web_server.web_server_public_ip
}
output "example_web_server_directory" {
  description = "Directory served as the web root for the example web server"
  value       = module.example_web_server.web_server_directory
}
In the main configuration, outputs are defined to capture information from the example_web_server module. The example_web_server_ip output retrieves the public IP address, and the example_web_server_directory output captures the web root directory.
Benefits of Variables and Outputs in this Example
- Customization: Users can customize the web server’s port and web root directory by providing values for the corresponding variables, making the configuration dynamic.
- Information Sharing: Outputs allow the main configuration to access information generated by the web_server_module. In this case, it captures the public IP address and the web root directory.
- Reusability: The web_server_module can be reused in different configurations with varying port numbers and web root directories, promoting code reuse.
- Documentation: Variable and output definitions serve as documentation, providing clarity on the expected inputs and outputs of the Terraform configurations.
By effectively using variables and outputs, the Terraform configuration becomes more dynamic, modular, and extensible, allowing for easy customization and information sharing within and between modules.
Best Practices for Terraform
Organizing Terraform Code
- Directory Structure: Organize your Terraform code into a clear directory structure:
/main_configuration
├── main.tf
├── variables.tf
├── outputs.tf
├── terraform.tfvars
├── web_server_module
│ ├── main.tf
│ ├── outputs.tf
│ ├── variables.tf
Structure your code logically to distinguish between main configurations and modules
- Separation of Concerns: Define separate modules for different functionalities, such as the main configuration and the web server module. This promotes reusability and maintainability.
- Naming Conventions: Use consistent and meaningful names for variables, resources, and modules. Follow a naming convention to enhance code readability.
Version Control, Collaboration, and Local Backends
- Version Control: Store your Terraform code in a version control system like Git. Maintain a clean commit history and use branches to manage different environments.
- Collaboration: Establish a collaborative workflow with code reviews and documentation. Clearly communicate coding standards and practices to team members.
- Local Backend: For local development, use a local backend to store the Terraform state file:
					# main_configuration/main.tf

terraform {
  backend "local" {
    path = "terraform.tfstate"
  }
}
The local backend stores the state file on your machine. This is suitable for individual development and testing.
- Remote Backend: Use a remote backend (e.g., AWS S3, Azure Storage, or HashiCorp Terraform Cloud) for centralized state storage. This facilitates collaboration and ensures secure access to the Terraform state.
- State Locking (Optional): Consider enabling state locking even for local backends if you plan to collaborate or share your code. It helps prevent concurrent modifications to the Terraform state.
					# main_configuration/main.tf

terraform {
  backend "local" {
    path         = "terraform.tfstate"
    lock         = true
    lock_message = "Locked by [Your Name] for [Purpose]"
  }
}
Security and Maintenance
- Secrets Management: Avoid hardcoding sensitive information in Terraform files. Utilize local environment variables or a secure mechanism suitable for local development.
- Regular Updates: Keep Terraform and any necessary local dependencies up to date. Regularly check for updates to ensure stability and security.
- Documentation: Provide comprehensive documentation for configurations and modules. Include information on variables, outputs, and any specific considerations for local development.
- Testing: Implement testing for your Terraform code, even in a local development environment. This ensures that your configurations work as intended.
By adhering to these best practices, you can maintain a well-organized, collaborative, and secure approach to managing your Terraform infrastructure code. This ensures consistency and scalability in your infrastructure-as-code projects.
Advanced Topics in Terraform
1. Workspaces
Terraform workspaces allow you to manage multiple resources of your infrastructure configurations within the same root module. This is useful for scenarios like separate environments (dev, staging, production) or different configurations for the same resources.
Example Usage
					# main_configuration/main.tf

provider "local" {}

resource "null_resource" "web_server" {
  provisioner "local-exec" {
    command = "python3 -m http.server 8080"
  }
}
Initialize and create a dev workspace
					terraform init
terraform workspace new dev
terraform apply
Switch to staging workspace and apply changes
					terraform workspace new staging
terraform apply
2. State Locking
State locking is crucial in collaborative environments to prevent concurrent modifications to the Terraform state. It ensures that only one user at a time can make changes to the infrastructure.
					# main_configuration/main.tf
terraform {
  backend "local" {
    path         = "terraform.tfstate"
    lock         = true
    lock_message = "Locked by [Your Name] for [Purpose]"
  }
}
When you run terraform apply, Terraform will attempt to acquire a lock on the state file before making any changes. If another user is already holding the lock, Terraform will wait until the lock is released.
Practical implementation of Local Backend for state with Simple web server
If you want to use a remote state configuration locally, you can utilize the local backend for Terraform. This allows you to mimic the behavior of a remote backend but still store the state file locally. Here’s an example using a simple web server without a cloud provider:
Step 1: Initial Configuration for Web Server
main_configuration/main.tf
					provider "local" {}
  # Use the local provider for running local-exec provisioner

terraform {
  backend "local" {
    path = "/mnt/d/config1/statefile.tfstate"
  }
}

variable "port" {
  description = "Port on which the web server will run"
  type        = number
  default     = 8080
}

output "webserver_ip" {
  description = "IP address of the web server"
  value       = "http://127.0.0.1"
}

resource "local_file" "web_server_info" {
  content  = "Web server information from Module"
  filename = var.web_server_info_filename
}

resource "null_resource" "web_server" {
   provisioner "local-exec" {
    command = "python3 -m http.server ${var.port}"
  }
}

variable "web_server_info_filename" {
  description = "Filename for web server information"
  type        = string
  default     = "web_server_info.txt"
}
Step 2: Apply the Initial Configuration
Initialize and apply the initial configuration
					terraform init
terraform apply
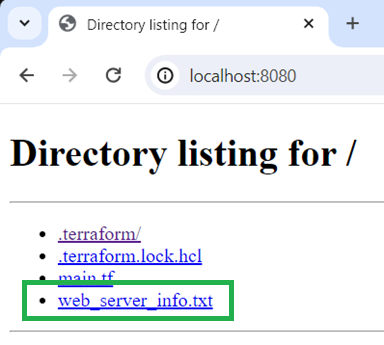
Browser output
Step 3: Create a New Configuration Using Remote State Locally
new_configuration/main.tf
					provider "local" {}

variable "additional_info_filename" {
  description = "Filename for additional information"
  type        = string
  default     = "additional_info.txt"
}

variable "port" {
  description = "port number"
  default = 8080
}

terraform {
  backend "local" {
    path = "/mnt/d/config2/statefile.tfstate"
  }
}

data "terraform_remote_state" "web_server_config" {
  backend = "local"
  config  = {
    path = "/mnt/d/config1/statefile.tfstate"
  }
}

resource "local_file" "additional_info" {
  content  = "Additional information from Config 2 using Config 1's state: ${data.terraform_remote_state.web_server_config.outputs.webserver_ip}"
  filename = var.additional_info_filename
}

resource "null_resource" "web_server" {
  provisioner "local-exec" {
    command = "python3 -m http.server ${var.port}"
    working_dir = path.module
  }
}
Step 4: Apply the New Configuration Using Remote State Locally
Change to the directory of the new configuration
cd new_configuration
Initialize and apply the new configuration using the remote state locally
					terraform init
terraform apply
Browser output
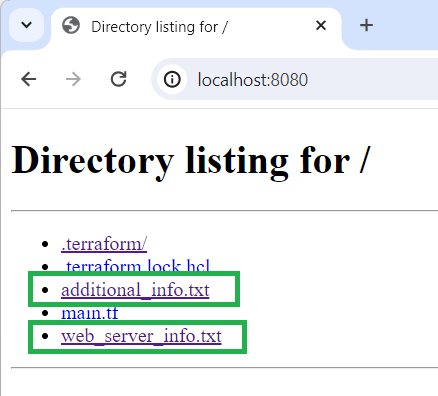
In this example:
- The initial configuration (main_configuration) sets up a local web server and uses the local backend for storing the state.
- The new configuration (new_configuration) references the state of the initial configuration remotely using a variable (web_server_info_from_remote_state).
- The state file from the initial configuration is used as a source for the remote state in the new configuration.
This approach allows you to use state information from one configuration in another configuration as if the state were remote, even though both configurations store their state files locally. Keep in mind that this is a simplified example, and in a production environment, you might want to consider more robust state management strategies.
Understanding Variables Precedence in Terraform
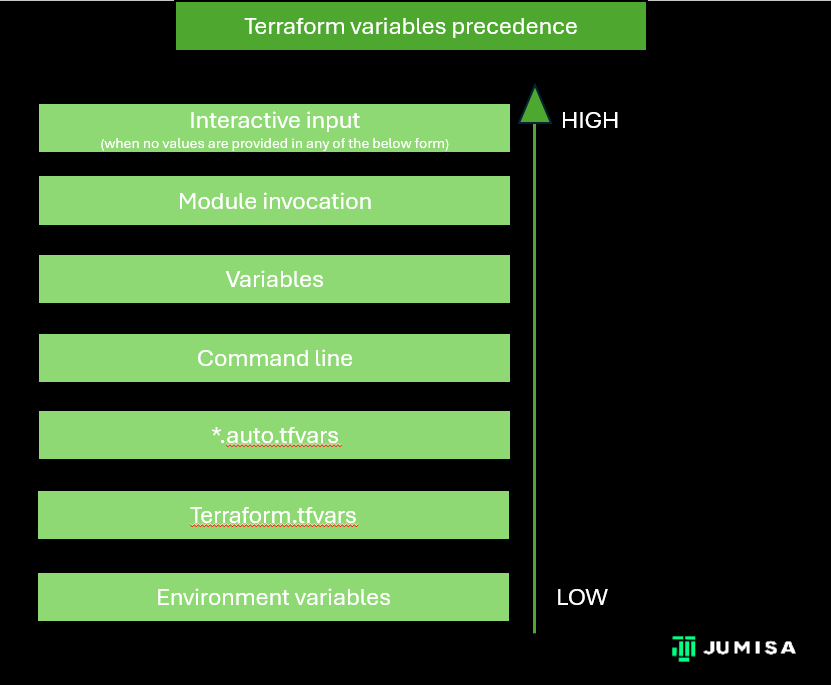
One crucial aspect of working with Terraform is understanding how variables are prioritized and overridden in different contexts. Let’s dive into the variable precedence in Terraform.
1. Environment Variables
Environment variables provide a way to set values for Terraform variables externally, allowing for flexibility and security in configuration. However, they have the lowest precedence compared to other sources.
Example
					export TF_VAR_server_name="my-web-server"
export TF_VAR_port="8080"
export TF_VAR_environment="development"
terminal output

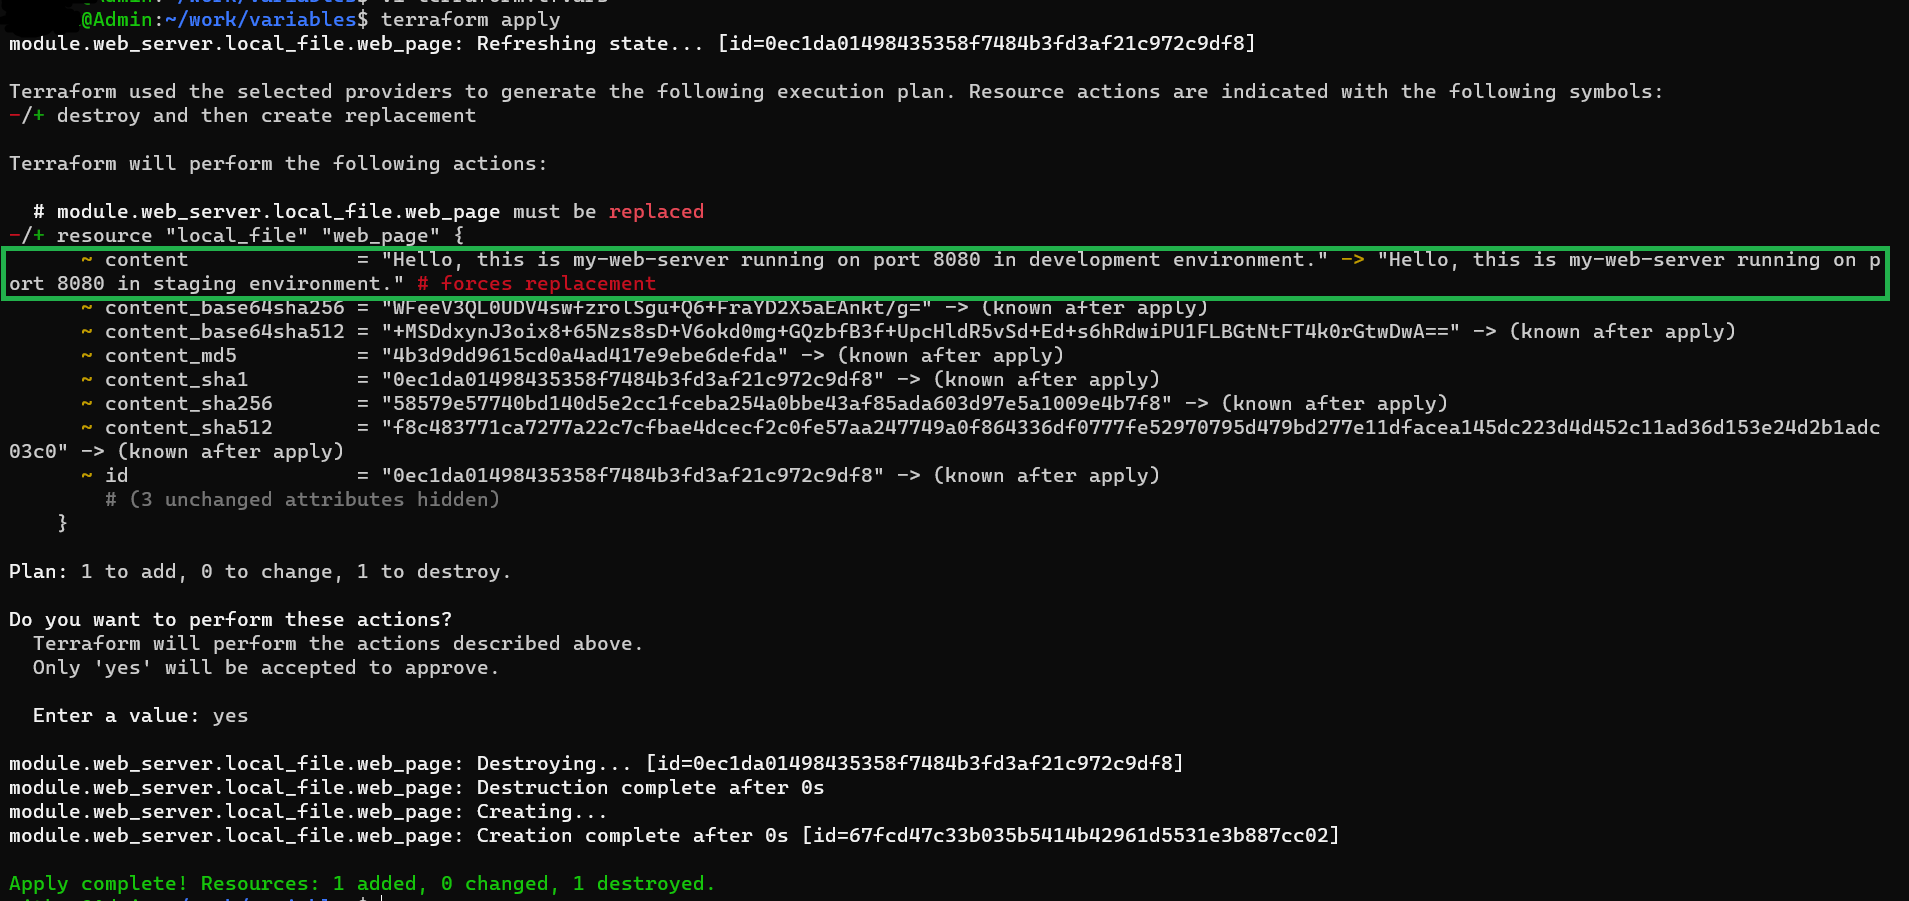
2. terraform.tfvars
The ‘terraform.tfvars’ file is a common way to store variable values for a Terraform configuration. It holds a higher precedence than environment variables and is specifically defined for the configuration.
Example
					# terraform.tfvars
server_name    = "my-web-server"
port           = 8080
environment    = "staging"
terminal output
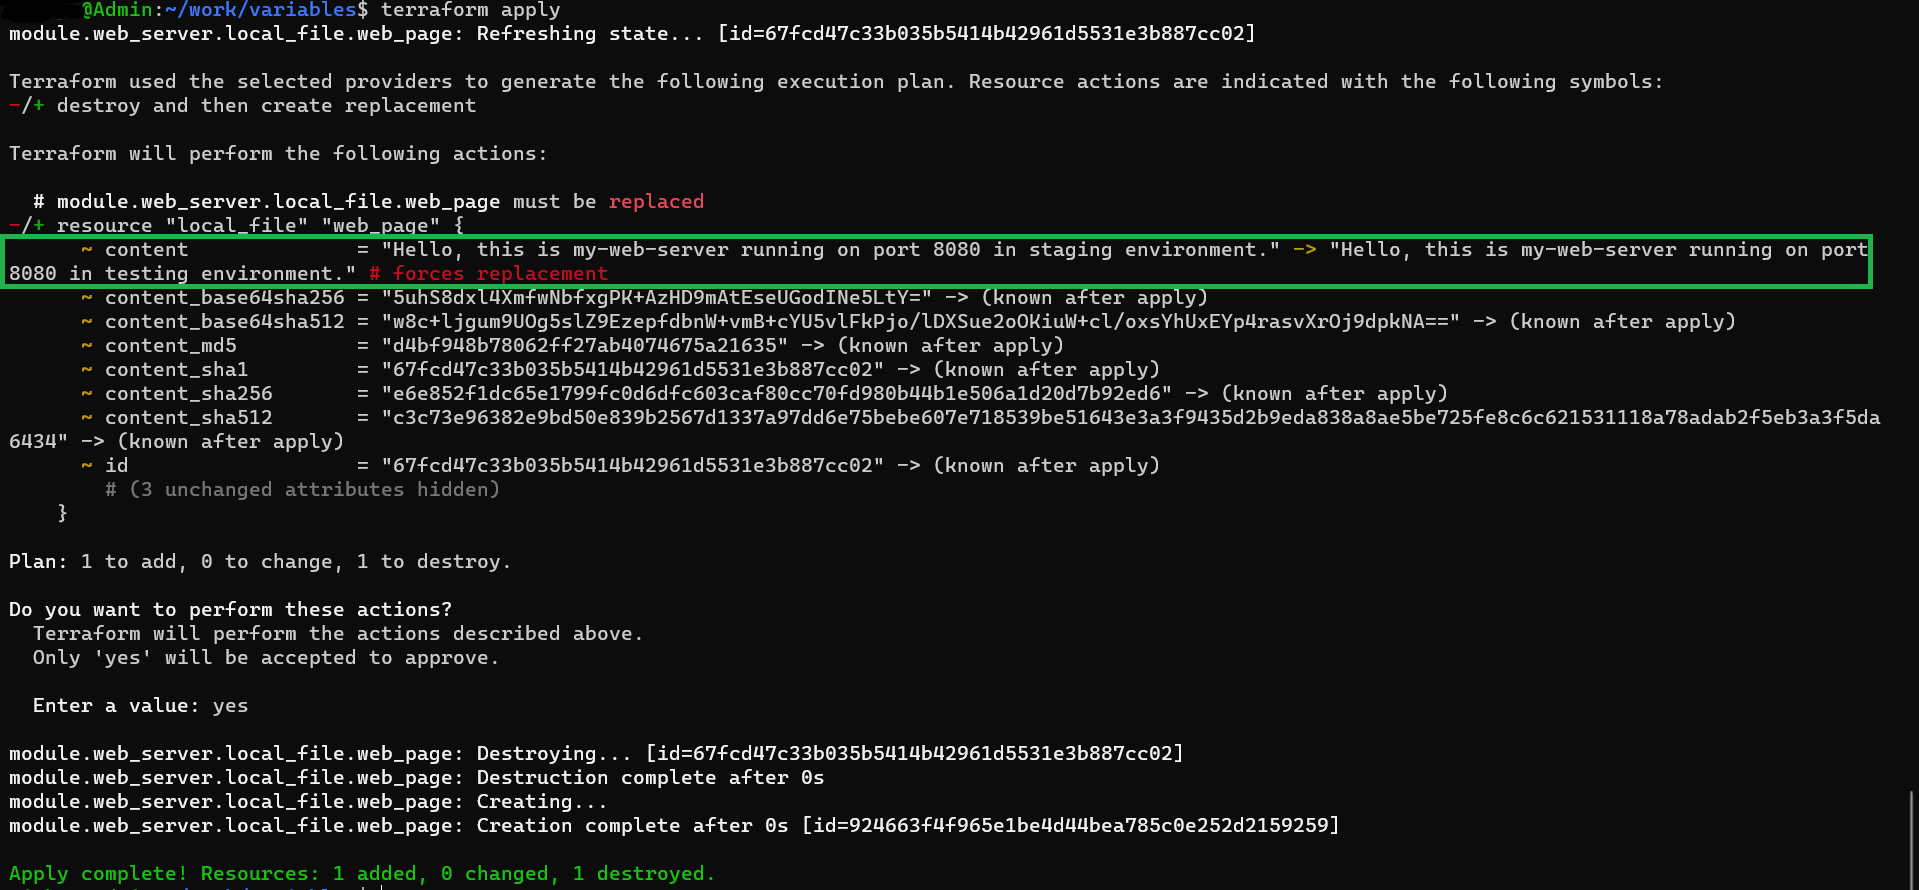
3. *.auto.tfvars
Files with names matching the pattern ‘*.auto.tfvars’ provide a convenient way to set variable values. They hold precedence over ‘terraform.tfvars’ and are automatically loaded by Terraform.
Example
					# .auto.tfvars
server_name    = "my-web-server"
port           = 8080
environment    = "testing"
terminal output
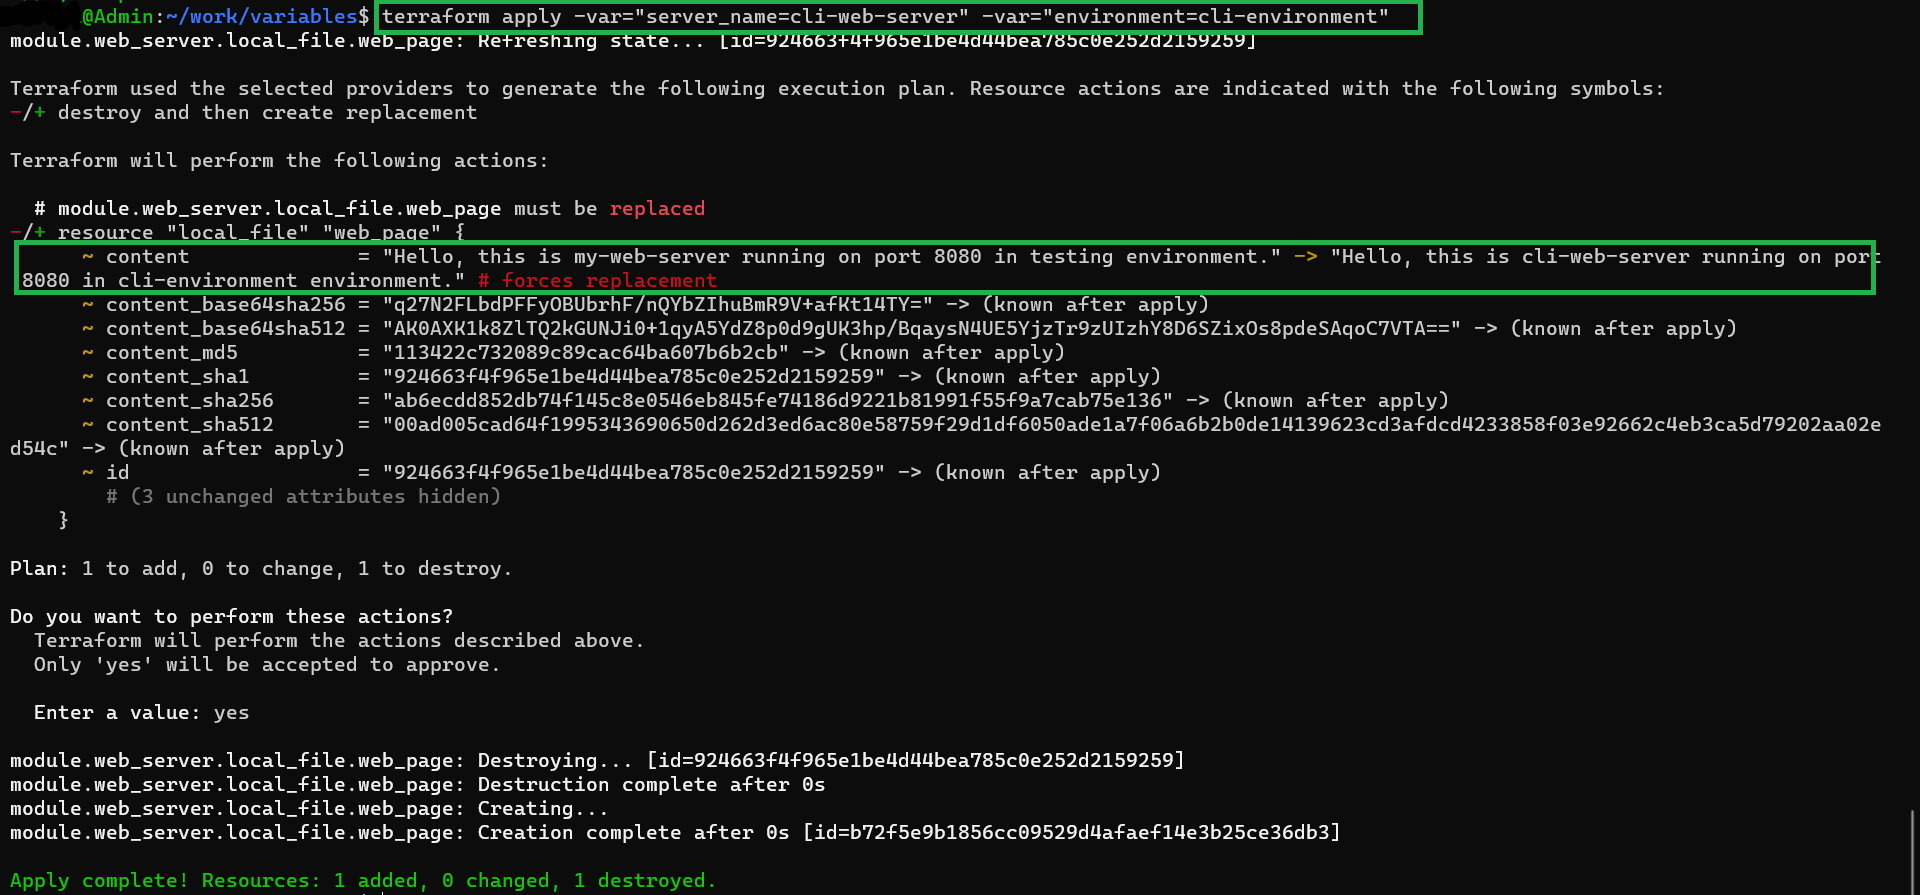
4. Command Line
Variables set via command line arguments (-var or -var-file) can override values from previous sources. This allows for dynamic configuration during Terraform execution.
Example
terraform apply -var="server_name=cli-web-server" -var="environment=cli-environment"
terminal output
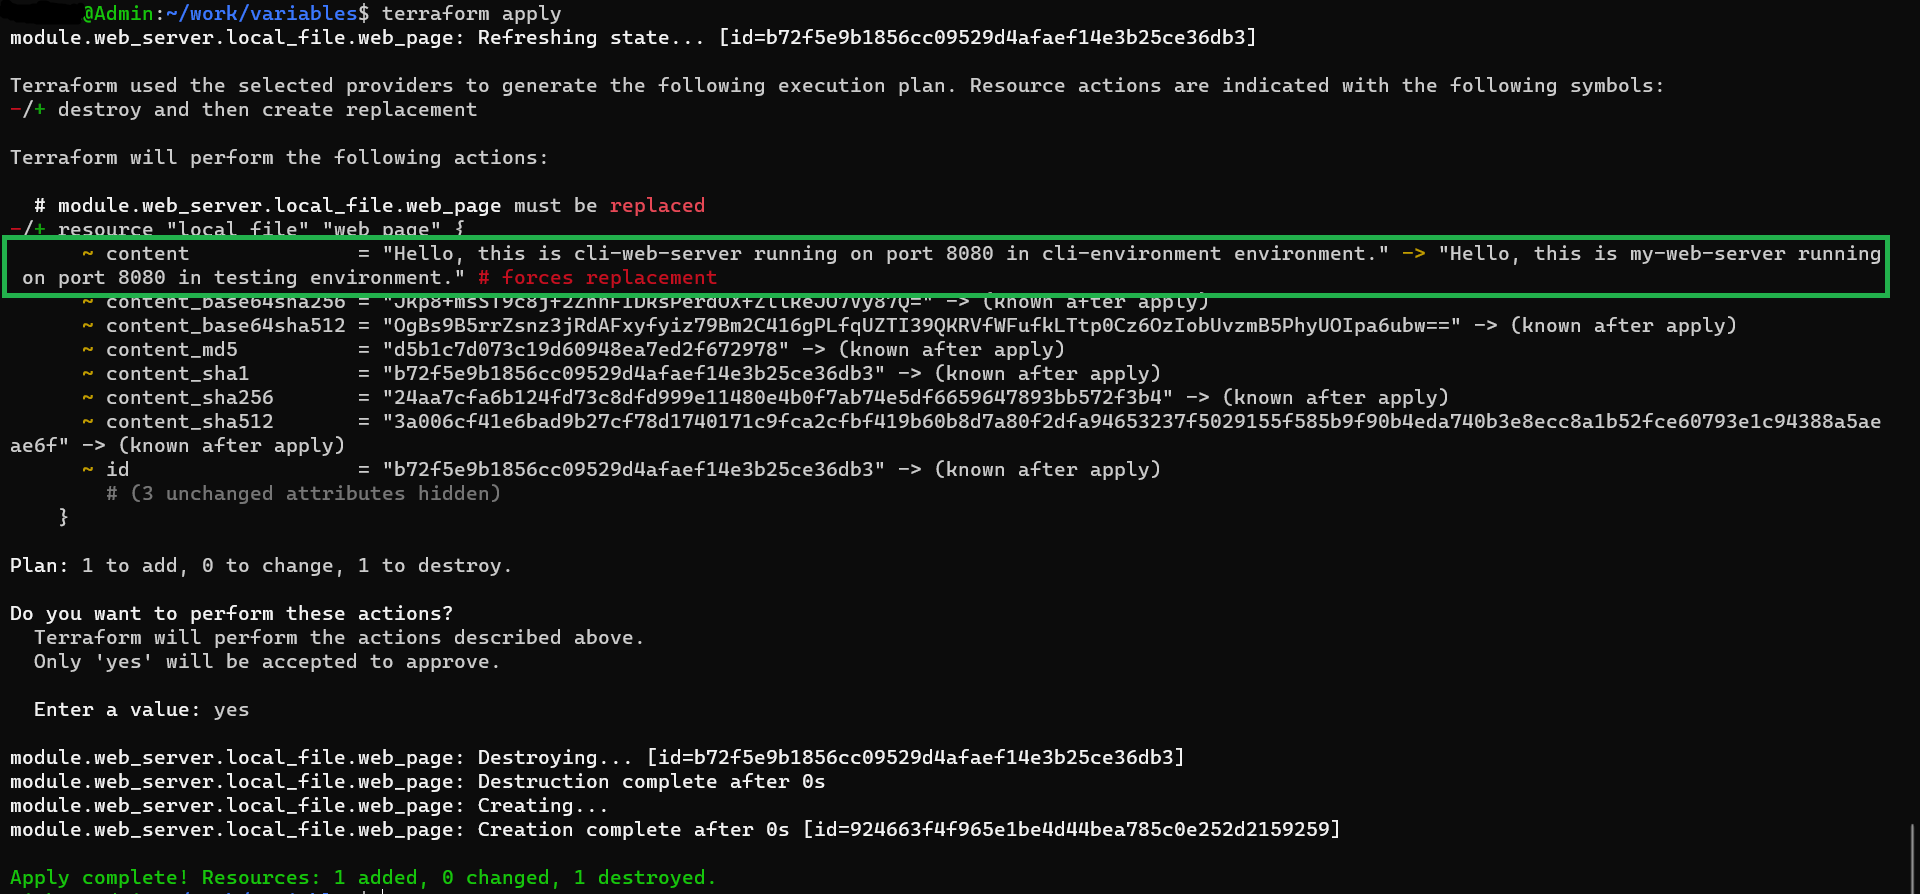
5. variables.tf
The variables.tf file within the Terraform configuration allows for explicit definition of variables. It acts as a default but is only used if no other source provides a value for that variable.
Example
					# variables.tf

variable "server_name" {
  description = "Name of the web server"
  default     = "my-web-server"
}

variable "port" {
  description = "Port on which the web server will run"
  default     = 8080
}

variable "environment" {
  description = "Environment for the web server"
  default     =”testing”
}
terminal output
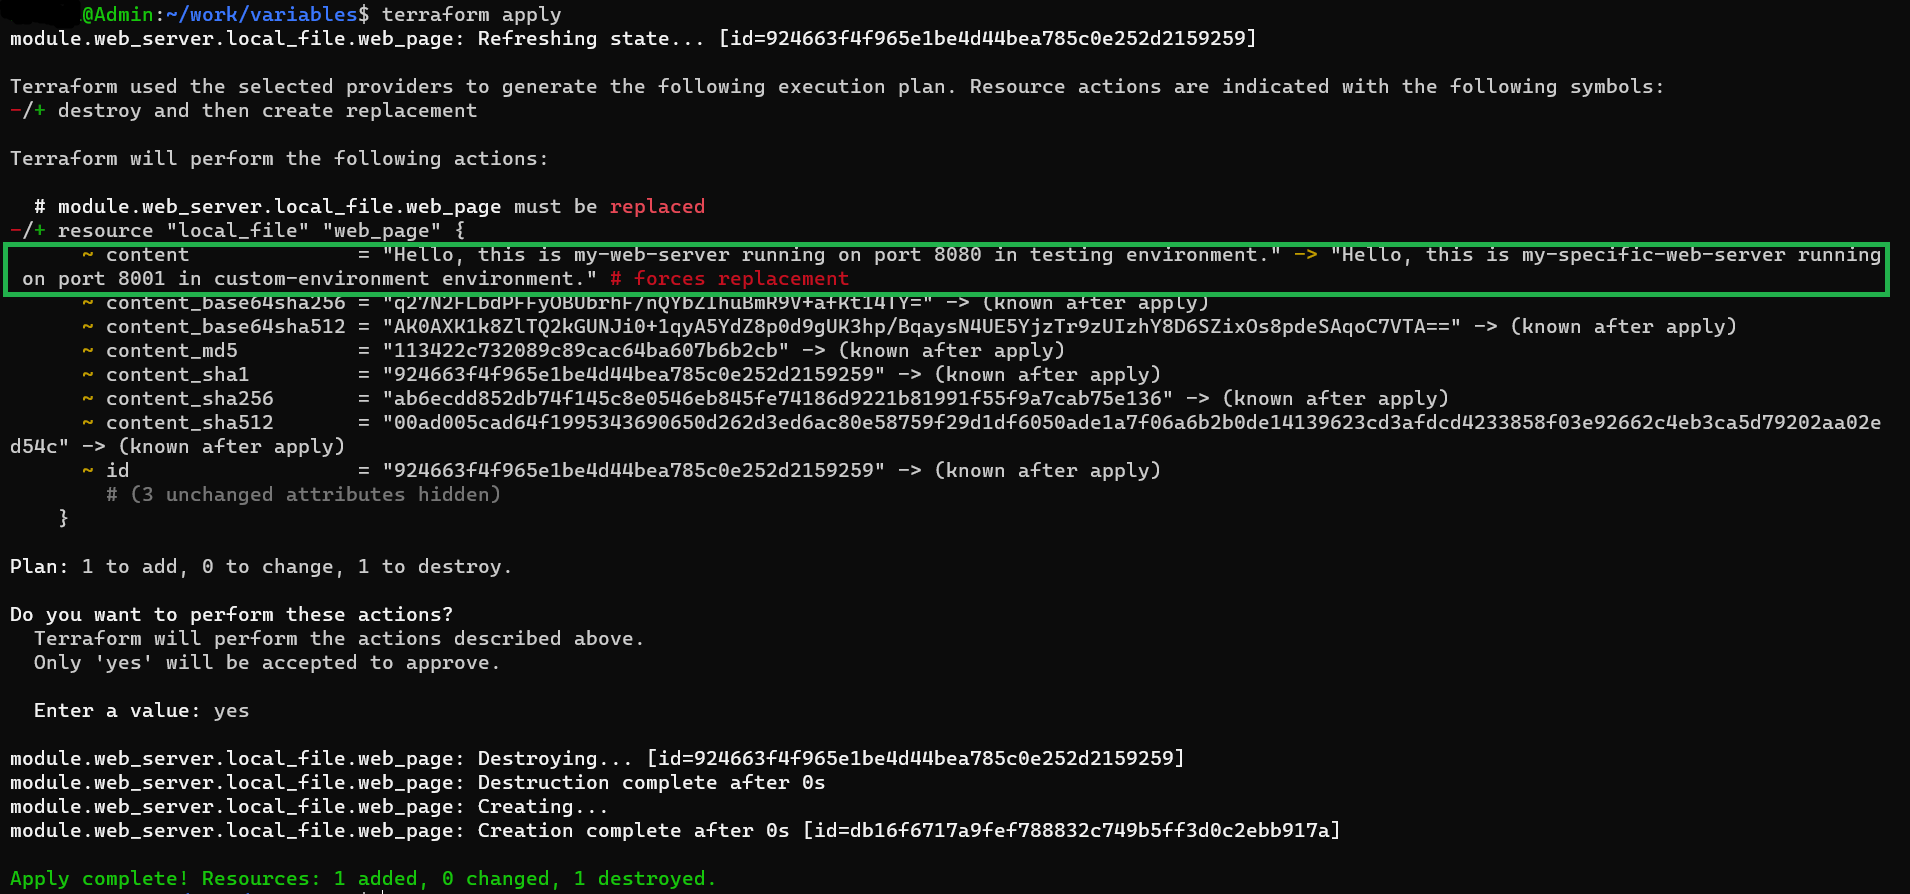
6. Module Invocation
Variables provided when invoking a module are the most specific and hold the highest precedence within that module’s context.
Example
					module "web_server" {
  source        = "./modules/web_server"
  server_name   = "my-specific-web-server"
  port          = 8001
  environment   = "custom-environment"
}
terminal output
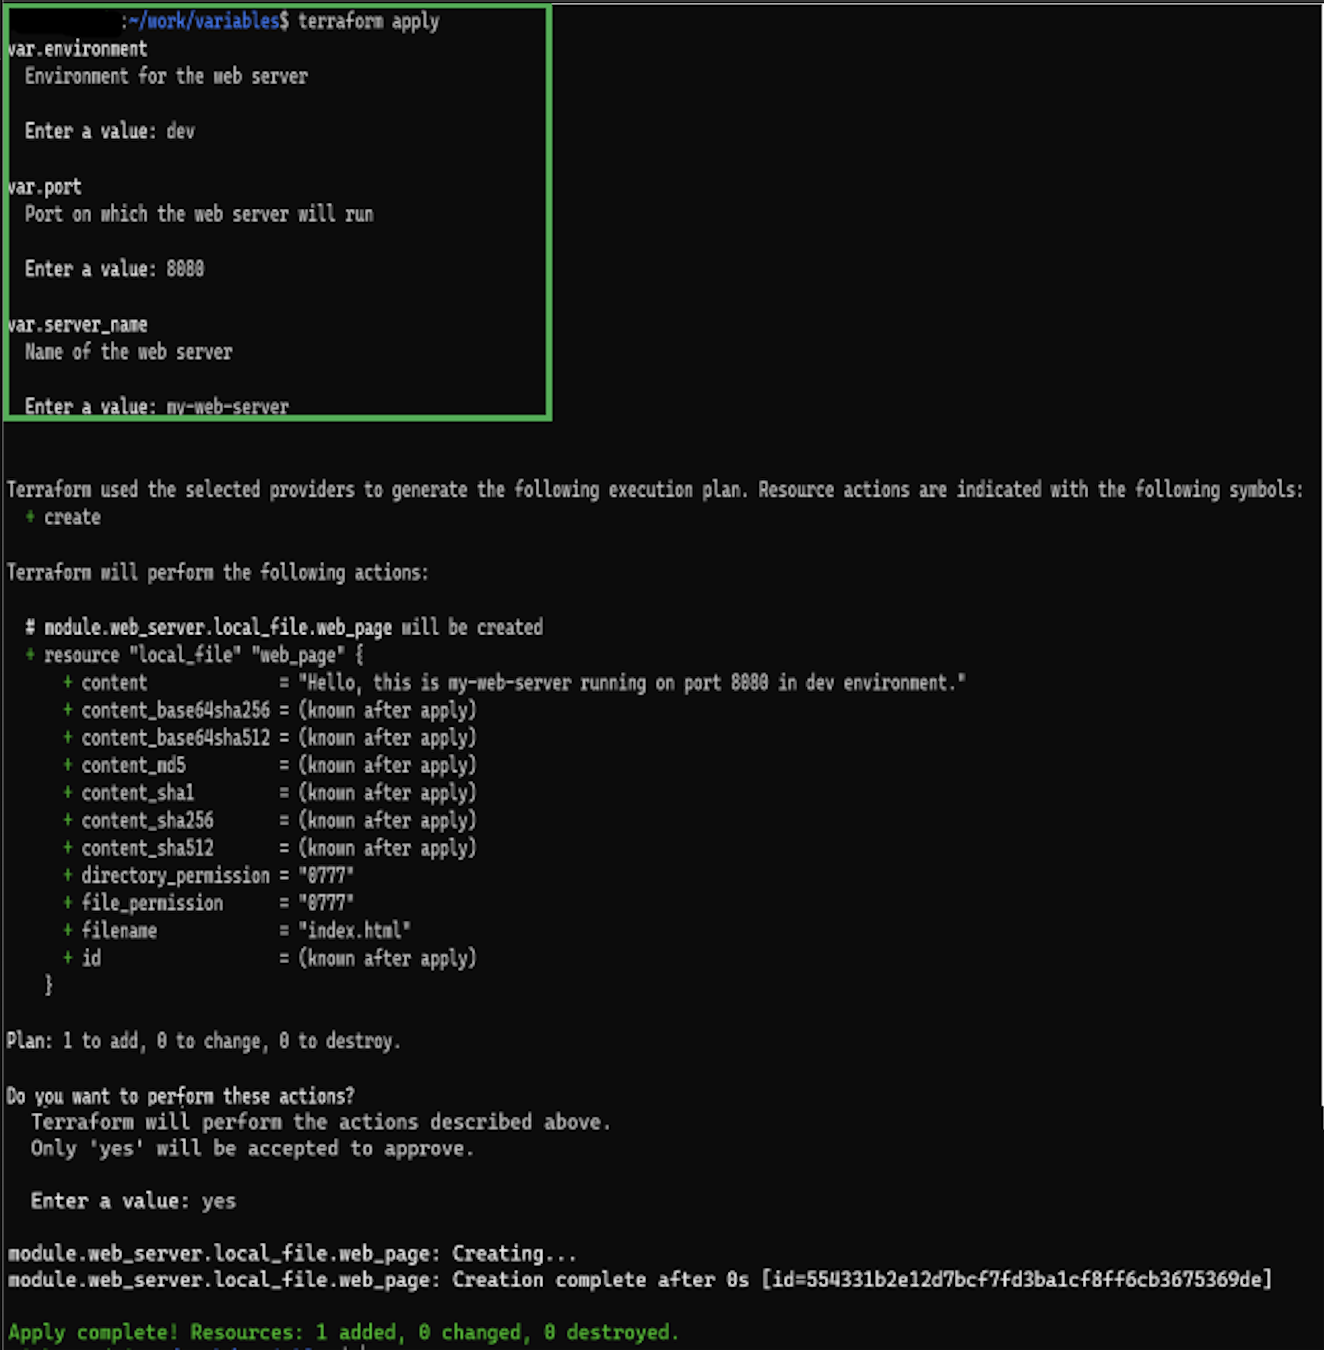
7. Interactive Input
This is the highest precedence when no other values are specified in the configuration or provided through other sources, it enters an interactive mode during command execution. In this mode, Terraform prompts the user for input, allowing them to enter values for the undefined variables.
terminal output
Best Practices when using Interactive Input
While interactive input provides flexibility, it’s generally advisable to define default values for variables in your configuration whenever possible. This helps avoid interruptions during non-interactive executions and ensures smoother automation workflows. Additionally, documenting variable requirements and defaults in your configuration enhances the usability of your Terraform code.
Terraform commands using simple web server configuration as an example
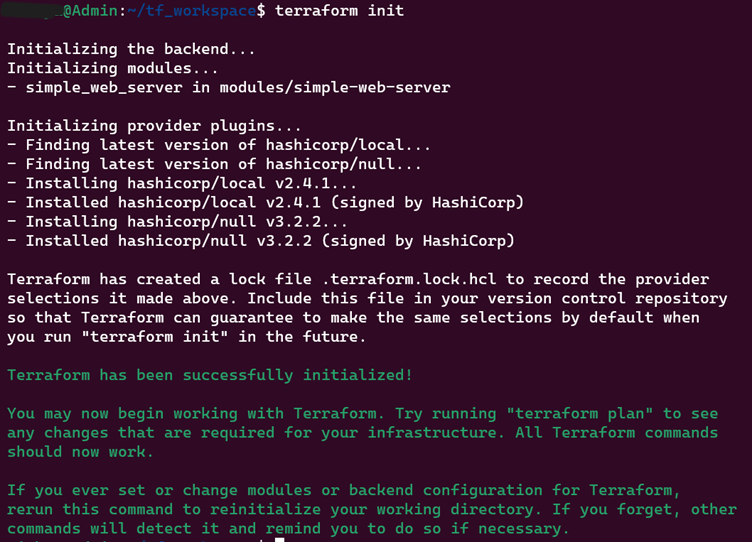
1. terraform init
Initializes a working directory, downloads necessary plugins/modules, setting up the environment for further actions.
2. terraform validate
Validate the syntax & configuration. Catches errors before applying changes to the infrastructure

3. terraform plan
Generates an execution plan, enabling review of infrastructure changes.

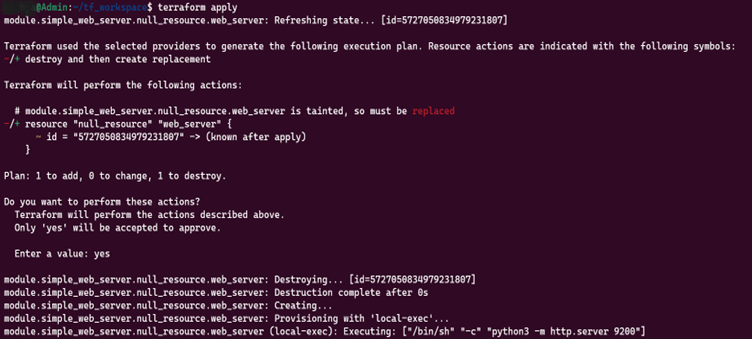
4. terraform apply
Apply changes to create, modify, or delete resources. Always review the execution plan before applying changes.
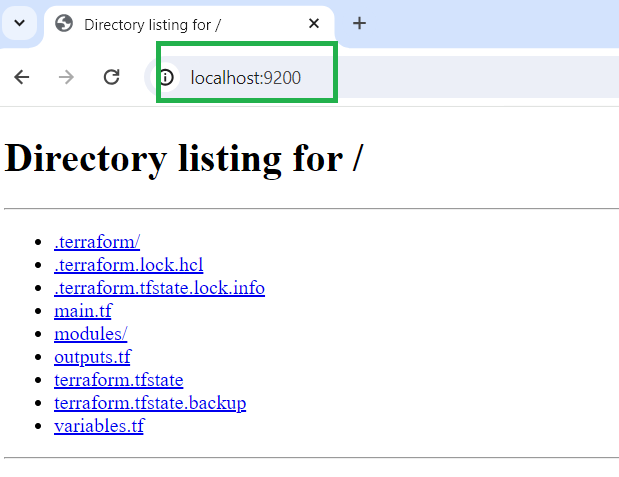
Browser output
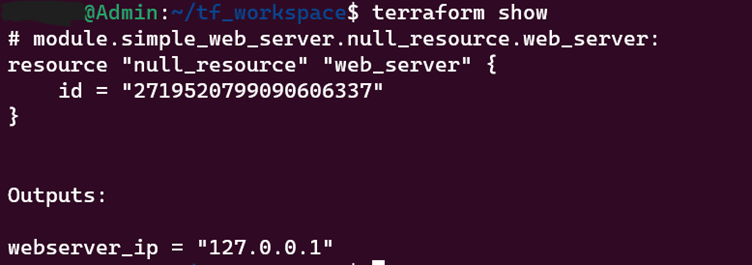
5. terraform show
View the current state of infrastructure in a human-readable format.
6. terraform state list
List the resources being managed by the current working directory and workspace, providing a complete or filtered list.

7. terraform state show
Print terraform state / metadata of the current working directory and workspace, including generated read-only attributes.

8. terraform workspace new dev
This command will allow you to create a new workspace. Here workspace named dev is created.

9. terraform workspace list
This command will display the list of all the existing workspace.

10. terraform refresh
Updates the Terraform states by querying the actual infrastructure, ensuring that the state accurately represents the real-world infrastructure.

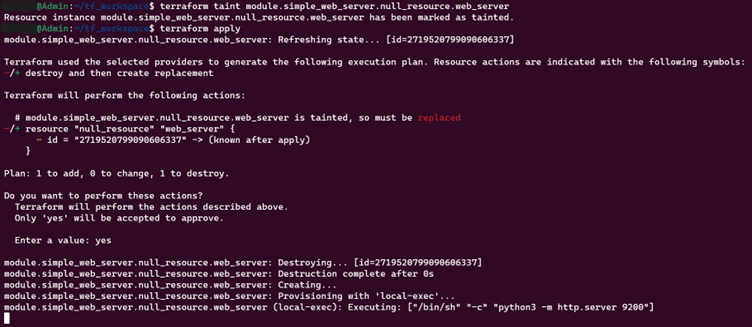
11. terraform taint
Marks a specific resource instance for recreation during the next apply.
12. terraform untaint
Removes the “tainted” state from a resource, allowing it to be managed normally again in subsequent apply operations.

13. terraform graph
Visualizes the dependency graph between resources, aiding in understanding relationships and dependencies among resources.
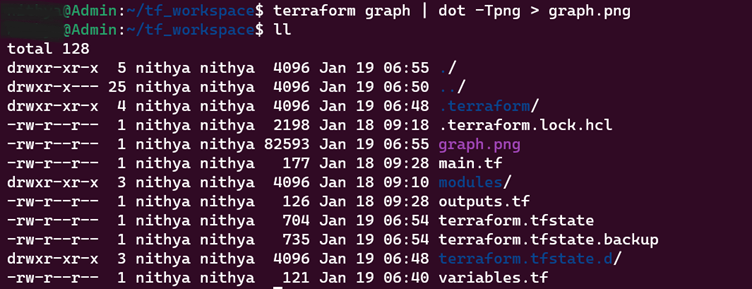
graph.png

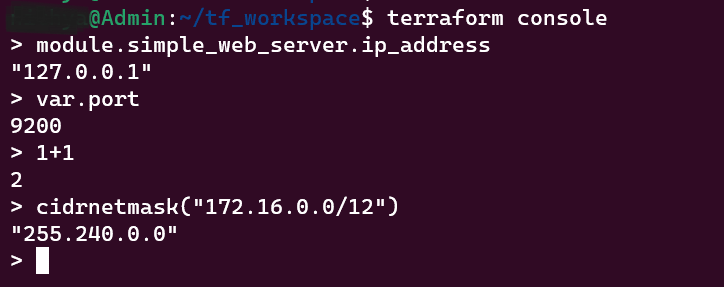
14. terraform console
Launch an interactive console for evaluating expressions and interpolations.
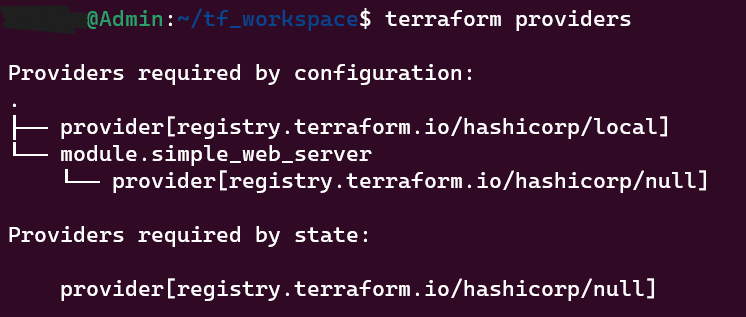
15. terraform providers
Lists all the providers used, offering insights into the various services or platforms integrated into the setup.
We highly appreciate your patience and time spent reading this article.
Stay tuned for more Content.
Happing reading !!! Let us learn together !!!


