In today’s ever-changing world of managing infrastructure, Terraform is offering unparalleled capabilities in automating and provisioning infrastructure. But to make the most of it and make your work smoother, you need other tools that work well with Terraform. These tools help you work better as a team, set up your infrastructure faster, and manage it easily. In this comprehensive guide, we’ll delve into the essential tools that enhance the Terraform experience, empowering teams to build, deploy, and manage infrastructure efficiently.
Table of Contents
Linting
tflint
tflint
Linting refers to the process of automatically checking code for potential errors, bugs, or stylistic inconsistencies. In the context of Terraform or any other programming language, linting tools analyze the code against a set of predefined rules or coding standards. These tools help developers identify issues early in the development process, ensuring code quality, adherence to best practices, and consistency across projects. Linting does not execute the code but provides feedback on potential problems, such as syntax errors, unused variables, or violations of coding conventions, allowing developers to address them before deployment or execution.
It is a terraform linter for detecting errors that cannot be detected by terraform plan.
Features
- Find possible errors (like invalid instance types) for Major Cloud providers (AWS/Azure/GCP).
- Warn about deprecated syntax, unused declarations.
- Enforce best practices, naming conventions.
Installation
Refer the github link – tflint
Implementation
Create a terraform configuration files for creating the required resources. (Feel free to copy the files from this repository for learning purposes.)
Initialize the Terraform configuration and see the execution plan.
					terraform init
terraform plan
Output of terraform plan
There is no warnings or errors detected by terraform plan.


Output of tflint
There is a warning for unused declarations

Reference:
Static Analysis
Static analysis tools typically perform a deep examination of the codebase, looking for complex patterns, architectural flaws, security vulnerabilities, and performance bottlenecks.
					checkov
tfsec
Static analysis refers to the process of examining code without actually executing it. These tools can identify a wide range of issues beyond simple syntax errors or coding conventions, including design flaws, concurrency issues, memory leaks, and more.
Here we see the working of checkov and tfsec.
checkov
With a wide range of built-in checks and the ability to create custom policies, Checkov facilitates the proactive identification of misconfigurations, reducing the risk of security breaches and compliance violations.
Features
- Checkov supports AWS, Azure, Google Cloud, and Kubernetes, making it versatile for diverse cloud environments.
- Comprehensive set of policies covering IAM, encryption, networking, etc., designed to detect security risks and ensure compliance.
- Organizations can define tailored security and compliance policies, allowing Checkov to adapt to project-specific needs.
- Seamless integration into CI/CD pipelines for automated security checks, preventing issues from reaching production.
Installation
Refer the github link – checkov
Implementation
- Create a terraform configuration files for creating the required resources. (Feel free to copy the files from this repository for learning purposes.)
- Initialize the Terraform configuration.
terrafotm init - Get terraform plan file in JSON format. terraform plan -out tf.plan terraform show -json tf.plan > tf.json
- Run the below command to check the code for its correctness. checkov -f tf.json
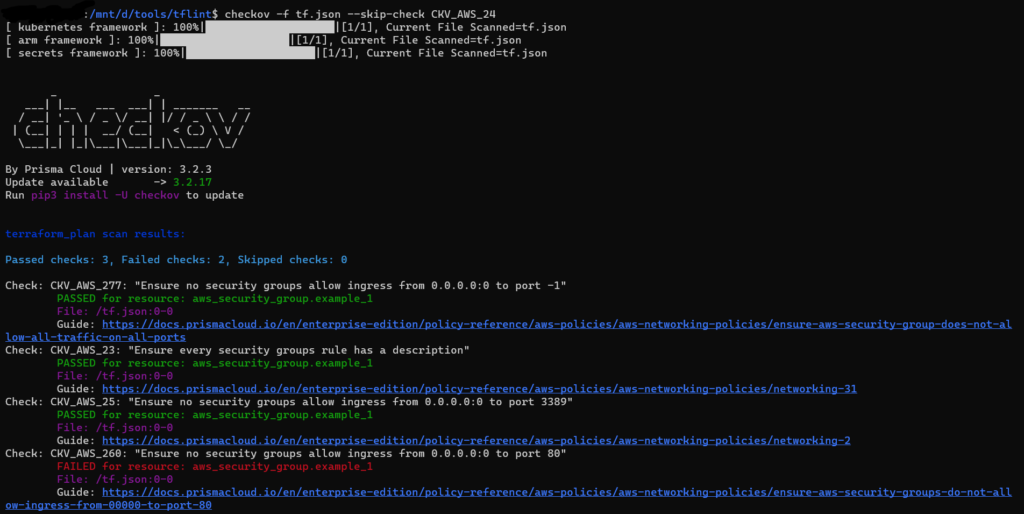
Output of checkov
Here the CKV_AWS_24 check is skipped
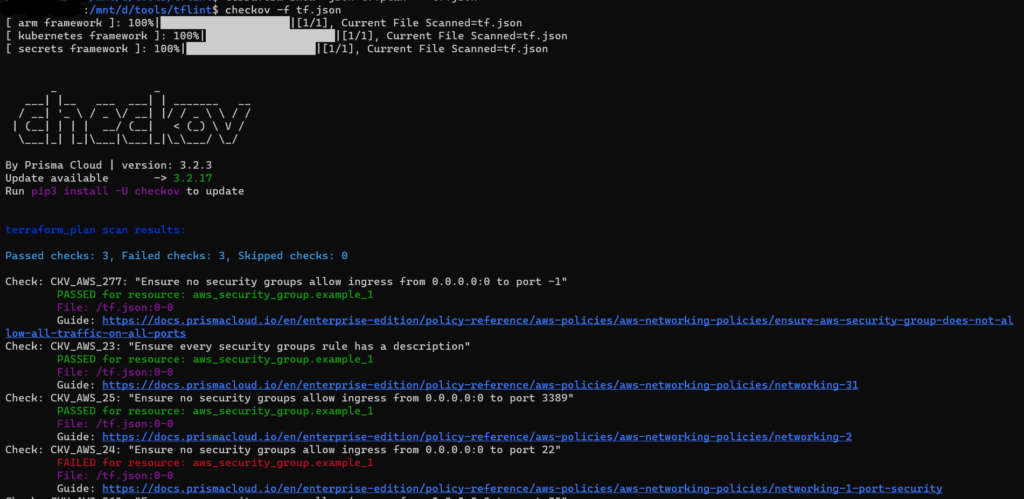
Output of checkov with multiple skip check
Here the CKV_AWS_24 and CKV_AWS_260 checks are skipped
Why skip-check?
Skipping checks in tools like Checkov might be necessary in certain scenarios, but it’s essential to approach this with caution and understanding. Here are some common reasons why you might consider skipping certain checks:
- False Positives: Checks performed by static analysis tools may sometimes produce false positives. If you believe a specific check is reporting an issue incorrectly, and it doesn’t represent an actual security concern, you might choose to skip that check.
- Not Applicable: Some checks may not be applicable to your specific use case or environment. For instance, a check related to a specific AWS configuration might not be relevant if you are not using that particular service.
- Temporary Workarounds: In some situations, you might be aware of a security issue, but due to certain constraints or dependencies, you might need to implement a temporary workaround. In such cases, you might choose to skip the relevant check until a permanent solution is feasible.
- Custom Policies: If you have defined custom policies that are specific to your organization’s requirements and don’t align with the pre-defined checks provided by the tool, you might choose to skip certain default checks.
- Project Phases: During different phases of a project, you might prioritize certain security checks over others. Skipping checks temporarily can be a way to focus on critical issues first and address others at a later stage.
It’s important to note that skipping checks should be a conscious decision made based on a thorough understanding of the implications. If you choose to skip certain checks, consider documenting the reasons for doing so and regularly review skipped checks to ensure they are justified.
Reference:
tfsec
It is a static analysis tool specifically designed for Terraform configurations. It supports terraform <0.12 & >=0.12 & directly integrates with HCL parser for better results.
Features
- It offers comprehensive coverage across major and some minor cloud providers, allowing users to identify misconfigurations and security issues in Terraform code spanning different cloud platforms.
- With hundreds of built-in rules, tfsec enables users to detect a wide range of misconfigurations, security vulnerabilities, and adherence to best practices in their Terraform code.
- tfsec goes beyond static analysis by evaluating not only literal values but also HCL expressions, Terraform functions (e.g., concat()), and relationships between Terraform resources. This comprehensive analysis ensures a thorough examination of the code.
- The tool supports multiple output formats, including lovely (default), JSON, SARIF, CSV, CheckStyle, JUnit, text, and GIF. It is configurable through both CLI flags and a config file, allowing users to tailor the tool to their specific needs and preferences.
- tfsec is known for its speed, capable of quickly scanning large repositories. It also offers plugins for popular Integrated Development Environments (IDEs) like JetBrains, VSCode, and Vim, enhancing user experience during development. The tool is community-driven, fostering collaboration and communication through channels like Slack.
Installation
Refer the github link – tfsec
Implementation
- Create a terraform configuration files for creating the required resources. (Feel free to copy the files from this repository for learning purposes.)
- Initialize the Terraform configuration.
terraform init
3. Run the below command to check the code for its correctness.
tfsec
Output of tfsec
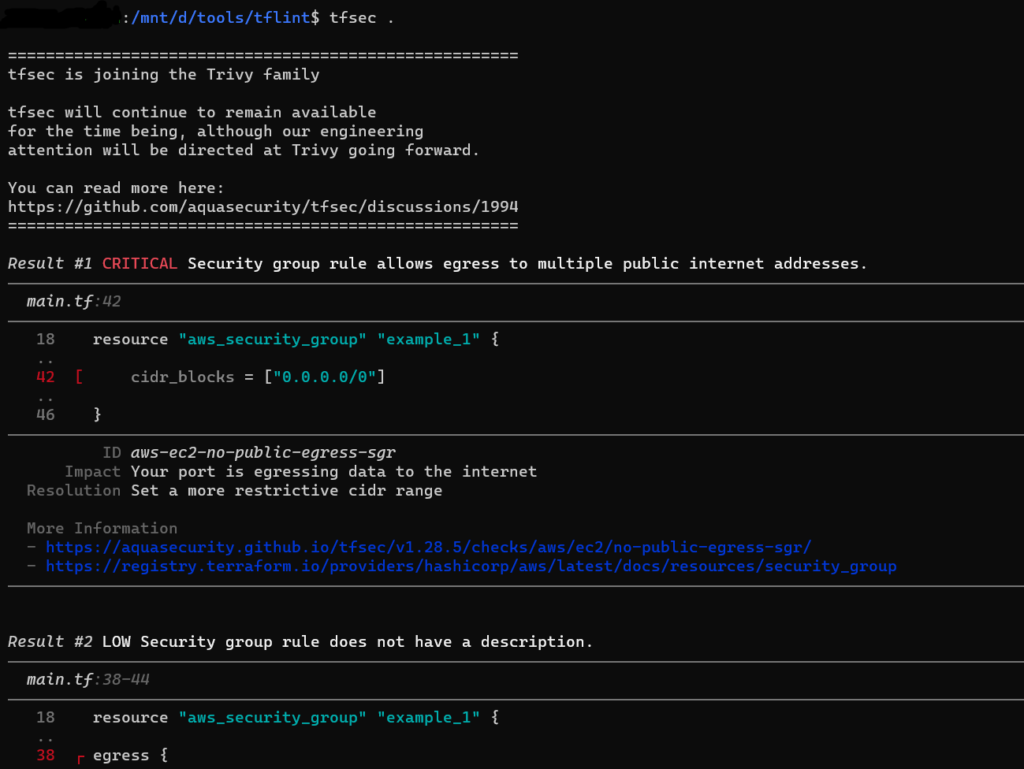
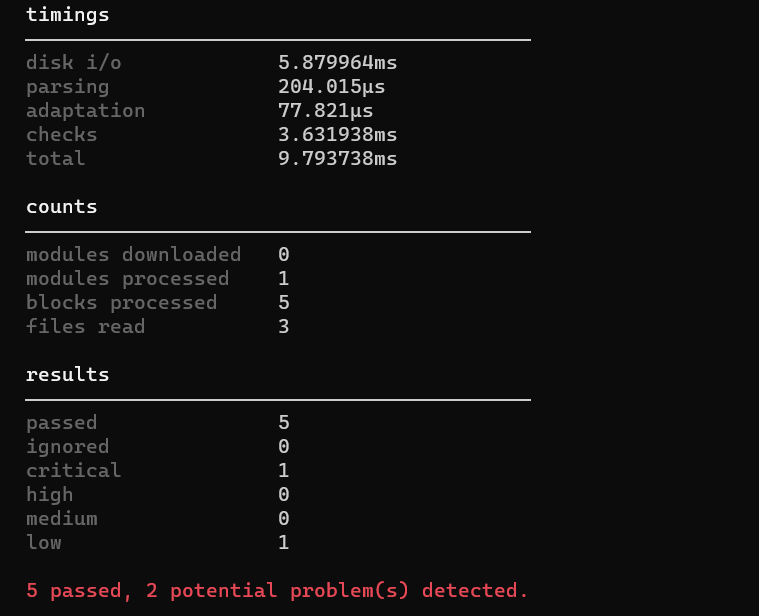
Below each check there is a reference link for debugging.
Ignoring Warnings:
To ignore warnings in tfsec during the execution of your Terraform scans, you can add a comment containing tfsec:ignore:<ID> to the line above the block containing the issue, or to the module block to ignore all occurrences of an issue inside the module. This is useful when certain warnings are intentional or not applicable to your specific use case.
ID: you can check in each warning of tfsec output.
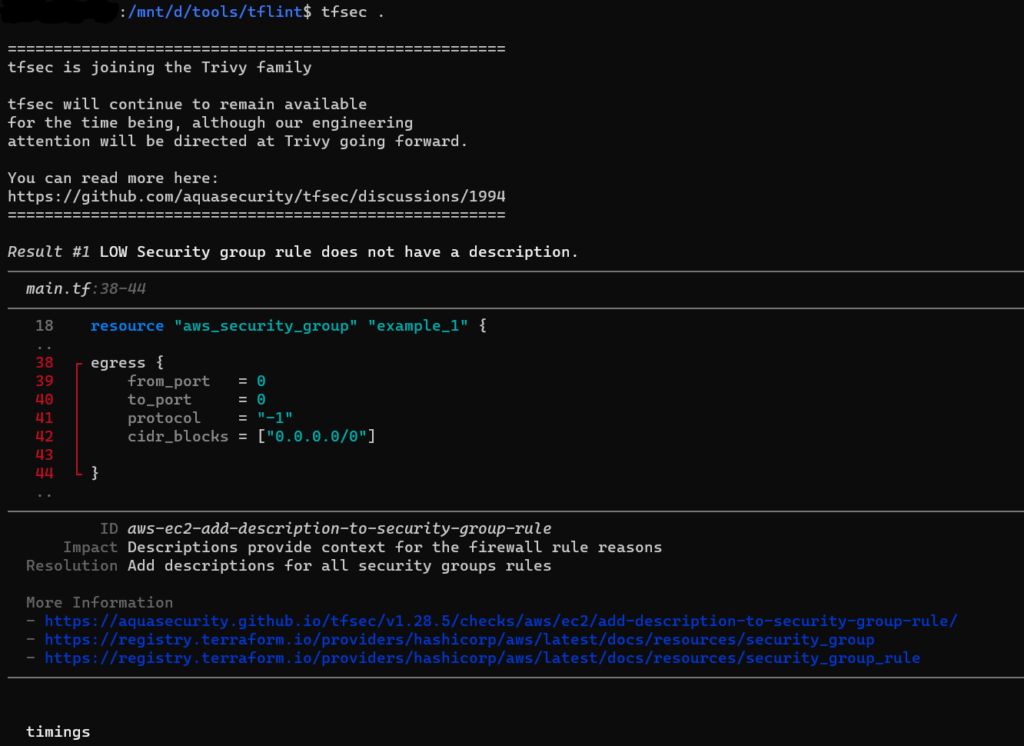
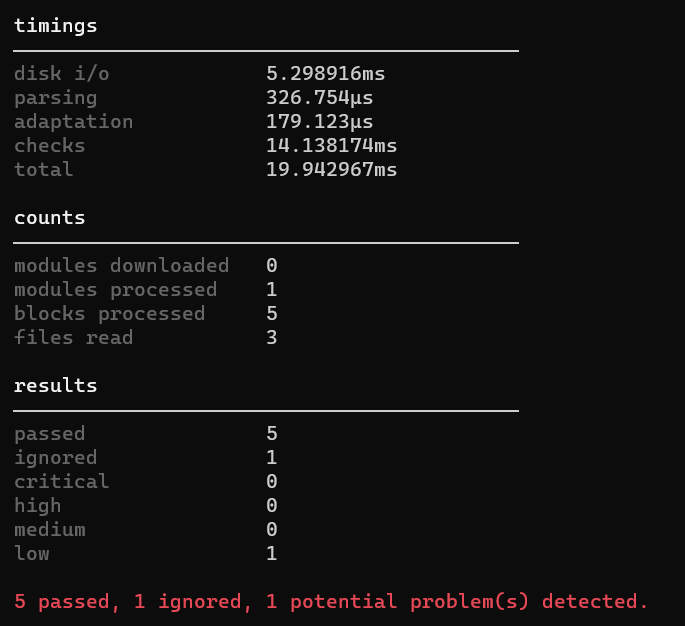
You can ignore multiple rules by concatenating the rules on a single line:
					#tfsec:ignore:aws-vpc-add-description-to-security-group tfsec:ignore:aws-vpc-no-public-egress-sgr
resource "aws_security_group" "bad_example" {
name  = "http"
description = ""
egress {
cidr_blocks  =  ["0.0.0.0/0"]
}
}
Expiration Date: You can set expiration date for ignore with yyyy-mm-dd format. This is a useful feature when you want to ensure ignored issue won’t be forgotten and should be revisited in the future.
#tfsec:ignore:aws-s3-enable-bucket-encryption:exp:2025-01-02
Ignore like this will be active only till 2025-01-02, after this date it will be deactivated.
Disable checks:
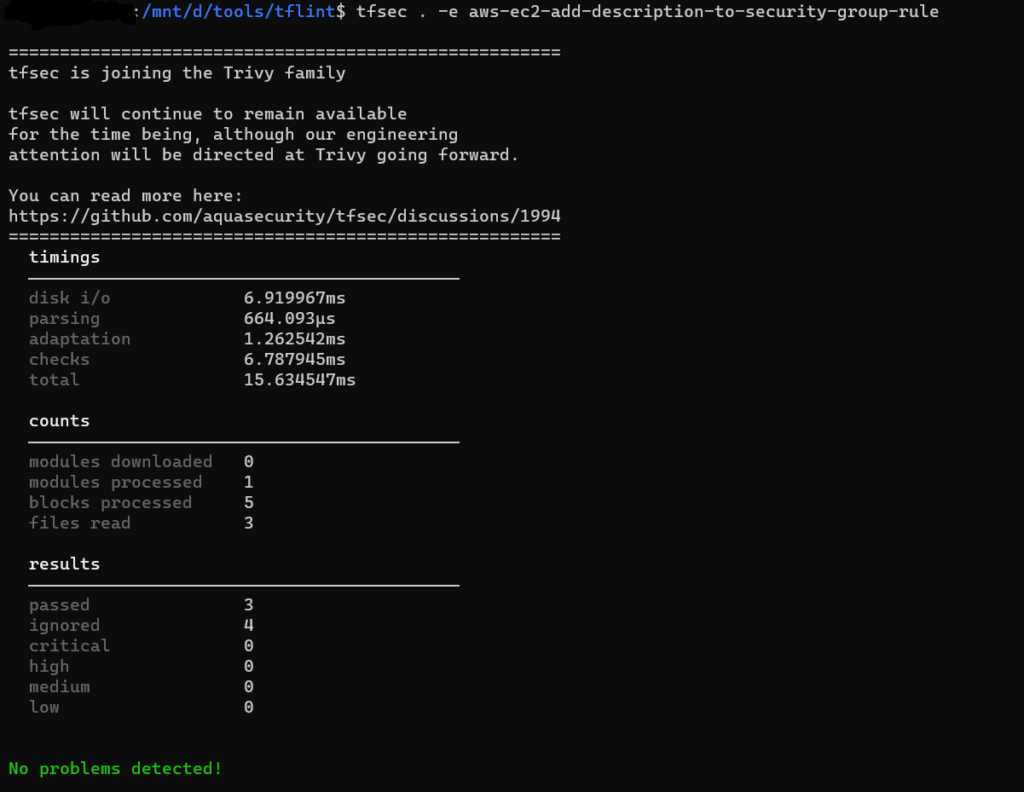
You may wish to exclude some checks from running. If you’d like to do so, you can simply add new argument -e check1,check2,etc to your CLI command,
Reference:
Sensitivity Masking
Masking sensitive data or credentials in Terraform configurations to enhance security.
tfmask
A sensitivity masking tool designed to conceal or obfuscate sensitive information, such as passwords, API keys, or other confidential data, within files, databases, or configurations. These tools typically employ encryption, hashing, or tokenization techniques to protect sensitive information from unauthorized access or exposure. Sensitivity masking tools play a crucial role in enhancing data security and compliance with privacy regulations by preventing inadvertent disclosure of sensitive data during development, testing, or deployment processes.
tfmask
It is an open-source utility created by CloudSkiff to enhance the security of Terraform outputs. When you run terraform plan or terraform apply, Terraform generates a plan that includes sensitive information in clear text. This information, if exposed, could pose a security risk. tfmask helps mitigate this risk by masking sensitive values, providing an added layer of security.
Features
- The primary function of tfmask is to mask sensitive information in Terraform output. This includes hiding values such as API keys, secret access keys, and other confidential data.
- tfmask provides flexibility in handling Terraform plan output. It can read from standard input (stdin) or take a file as input, making it adaptable to various workflows.
- tfmask supports JSON-formatted Terraform plan outputs. This is particularly useful when processing the output programmatically or in combination with other tools.
- While masking sensitive values, tfmask preserves the structure of the Terraform plan output. This ensures that the masked output remains readable and maintains the original format.
- Users can customize the masking behavior based on their specific requirements. The tool allows users to define custom masks for specific sensitive patterns, providing a tailored solution for different use cases.
- tfmask is operated through a command-line interface, making it easy to incorporate into scripts, automation, and CI/CD pipelines.
Installation
Compiled binaries are available on tfmask_releases.
For Linux, run the following command to download it:
sudo curl -L https://github.com/cloudposse/tfmask/releases/download/0.7.0/tfmask_linux_amd64 -o /usr/bin/tfmask
3. Mark it as executable by running:
sudo chmod +x /usr/bin/tfmask
Implementation
Create a terraform configuration files for creating the required resources. (Feel free to copy the files from this repository for learning purposes.)
Initialize the Terraform configuration and see the execution plan.
					terraform init
terraform plan
3. Run the below command to mask sensitive information.
terraform plan | tfmask
Output of terraform plan
Here no values has been masked.


Output of tfmask

Here, the http_tokens field has been masked. The tfmask utility will replace the “old value” and the “new value” with the masking character (e.g. *).

We can add fields to make it sensitive by below command
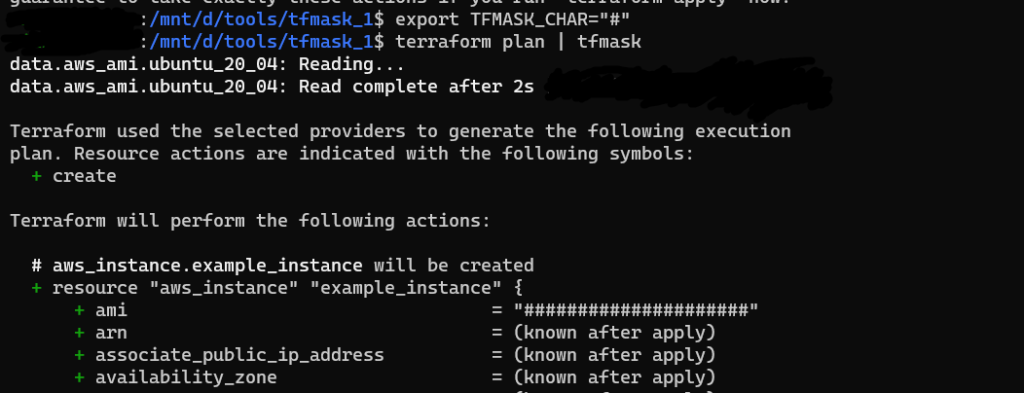
export TFMASK_VALUES_REGEX="(?i)^.*[^a-zA-Z](oauth|secret|token|password|key|result|ami).*$"
Here, I have added ami in command

We can change the masking character by export TFMASK_CHAR=”#” command.
Reference:
Cost Estimation
Predicting the cost of infrastructure changes before applying them using Terraform.
infracost
Tool used to estimate costs for your infrastructure deployments.
infracost
Infracost provides cost estimates for Terraform before deployment. Infracost enables you to easily see cost estimates for your resources and enable the engineering teams to better understand their infrastructure changes from a business perspective.
Features
- Seamless integration with Terraform allows users to generate cost estimates for infrastructure changes before applying them.
- Infracost provides detailed cost breakdowns, showing the individual costs associated with each resource. This granularity helps users identify cost drivers and make informed decisions.
- Users can leverage Infracost for budget forecasting by estimating the cost of infrastructure changes over time. This aids in planning and ensures alignment with financial goals.
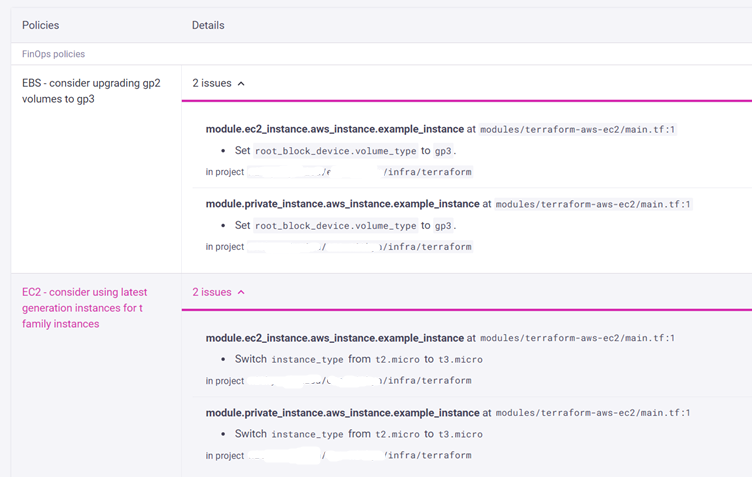
- See costs and best practices in dashboard. It is a SaaS product that builds on top of Infracost open source and works with CI/CD integrations.
- Generate a difference in cost by comparing the latest code change with the baseline.
Installation
Refer the link – quick-start
Implementation
- Create a terraform configuration files for creating the required resources.
- Initialize the Terraform configuration and see the execution plan.
terraform init
3. Run the below command to mask sensitive information.
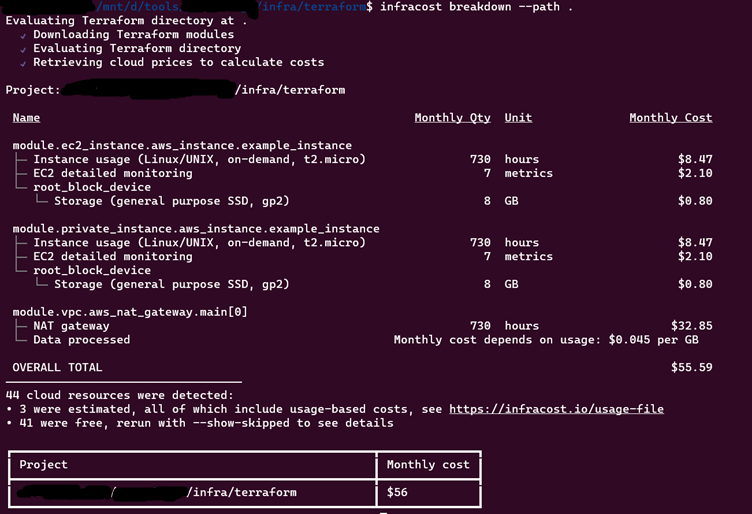
infracost breakdown --path
Output of infracost
Show cost estimate difference
- Generate an Infracost JSON file as the baseline.

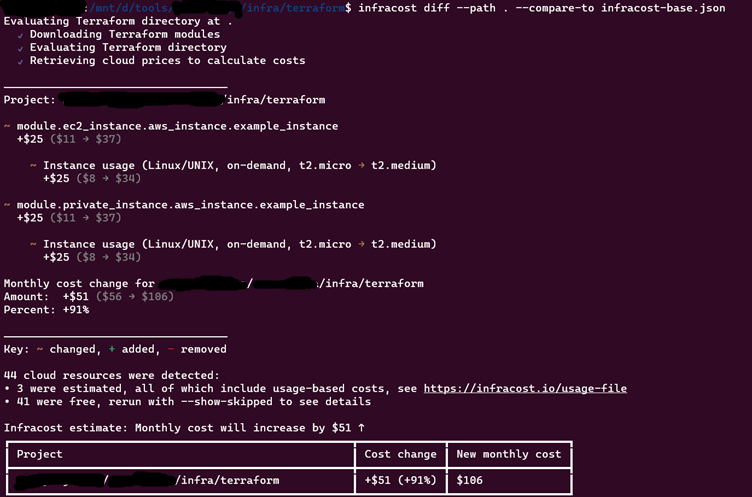
2. Edit your Terraform project. In main.tf file, change the instance type from t2.micro to t2.medium
3. Generate a diff by comparing the latest code change with the baseline:
infracost diff --path . --compare-to infracost-base.json
See costs and best practices in dashboard
infracost upload --path infracost-base.json

Log in to Infracost Cloud > Visibility > Repos page to see the cost estimate.
Reference:
Documentation Generation
Automatically generating documentation for Terraform configurations to enhance clarity and understanding.
infracost
The tools help automate the generation of documentation for Terraform configurations. One popular tool for this purpose is called terraform-docs.
terraform-docs
It is a utility that automates the generation of documentation for Terraform projects. It extracts metadata and descriptions from Terraform configurations and produces consistent and readable documentation in various formats.
Features
- Supports various output formats such as Markdown, JSON, and more. This flexibility allows integration with different documentation platforms and workflows.
- Users can customize documentation templates to match the style and requirements of their organization. This includes adjusting headings, ordering, and content.
- Extracts metadata from Terraform configurations, including variable descriptions, resource explanations, and module details, providing a comprehensive overview of the infrastructure.
Installation
Refer the link – terraform-docs
Implementation
The terraform-docs configuration file (.terraform-docs.yml) uses the yaml format in order to override any default behaviors. This is a convenient way to share the configuration amongst teammates, CI, or other tooling’s.
The default name of the configuration file is .terraform-docs.yml. The path order for locating it is:
- root of module directory
- .config/ folder at root of module directory
- current directory
- .config/ folder at current directory
- $HOME/.tfdocs.d/
To use an alternative configuration file name or path you can use the -c or –config flag.
Or you can use a config file with any arbitrary name as .tfdocs-config.yml, then the command is
terraform-docs -c .tfdocs-config.yml .
Open and copy the below content in a file named .terraform-docs.yml
					formatter: "yaml"  #This is required field

version: "0.17.0"

header-from: main.tf

recursive:
 enabled: true
 path: modules   # Path of terraform configuration files

sections:
 hide: []
 show: []

content: ""

output:
 file: output.yaml
 mode: replace
 template: |-
 <!-- BEGIN_TF_DOCS -->
 {{ .Content }}
 <!-- END_TF_DOCS -->

output-values:
 enabled: false
 from: ""

sort:
 enabled: true
 by: name

settings:
 anchor: true
 color: true
 default: true
 description: false
 escape: true
 hide-empty: false
 html: true
 indent: 2
 lockfile: true
 read-comments: true
 required: true
 sensitive: true
 type: true
Output
terraform-docs .
Output file will be generated as given in configuration output.yaml
If the code used has modules for the infrastructure, then in each module there is an output.yaml file generated with their corresponding documentation.
The default configurations and explanations can be found on terraform-docs_configurations.
Reference:
Terraform Version Management
Managing and switching between different versions of Terraform for compatibility and stability.
tfswitch
Terraform Version Management refers to the practice of effectively handling different versions of Terraform, the popular Infrastructure as Code (IaC) tool, within your development environment. As projects evolve and dependencies change, having the ability to switch between Terraform versions becomes essential for maintaining compatibility and ensuring smooth development workflows. One popular tool for this purpose is called tfswitch.
tfswitch
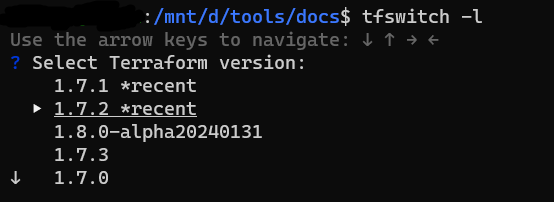
It is a command line tool used to switch between different versions of terraform. If there is no particular version of terraform installed, tfswitch will download the required version. The installation is minimal and easy. Once installed, simply select the version you require from the dropdown and start using terraform.
Features
- TFSwitch simplifies the process of switching between different Terraform versions. Users can seamlessly move from one version to another with a single command.
- Users can select a specific Terraform version to use for a particular project, ensuring that the correct version is applied for the project’s requirements.
- It can automatically download and install the specified Terraform version if it is not already available on the machine.
Installation
Installation for Linux OS:
- Switch to Super user
sudo su
2. Run the below command:
curl -L https://raw.githubusercontent.com/warrensbox/terraform-switcher/release/install.sh | bash
Installation for mac:
Refer tfswitch_install
Implementation
Commands:
					tfswitch

tfswitch 1.7.1 # enter specific version in CLI

tfswitch -l or tfswitch --list-all # Use drop down menu to select version
tfswitch -u or tfswitch –latest # install latest stable version only
					export TF_VERSION=1.6.1

tfswitch  # switch to version 1.6.1(specified in environment variable)
For more commands refer tfswitch quick start.
Reference
Module Testing
Testing Terraform modules to ensure they function correctly and meet requirements.
terratest
Module testing is a crucial aspect of infrastructure development, ensuring that Terraform modules behave as expected and meet the desired functionality and quality standards. One popular tool for this purpose is called terratest.
terratest
Terratest is an open source Go library that enables automated testing of Terraform code. It allows you to write and execute tests for your infrastructure code, helping to catch potential issues early in the development lifecycle.
Features
- Terratest supports multiple cloud providers, including AWS, Azure, Google Cloud, and more.
- It allows users to write tests for Terraform code, ensuring that infrastructure changes are validated against expected outcomes.
- Terratest is written in Golang, making it compatible with the Go programming language.
- Terratest deploys actual infrastructure changes to a real environment (e.g., AWS, Azure) for testing. This ensures that tests are conducted in an environment that closely resembles the production setup, providing more realistic results.
- Terratest is scalable and can handle testing scenarios ranging from simple to complex infrastructure setups.
Installation
Terratest uses the Go testing framework. To use Terratest, you need to install:
Go (requires version >=1.21.1)
Implementation
Let us take an example of simple hello world in terraform.
- Create 2 folders – example and test.
- In example folder, create terraform configuration files. In test folder, create a file with name ending with _test.go
- main.tf in example folder contains,
					terraform {
required_version = ">= 0.12.26"
}
# The simplest possible Terraform module: it just outputs "Hello, World!"
output "hello_world" {
value = "Hello, World!"
}
- terraform_hello_world_example_test.go in test folder contains,
					package test
import (
"testing"
"github.com/gruntwork-io/terratest/modules/terraform"
"github.com/stretchr/testify/assert"
)

func TestTerraformHelloWorldExample(t *testing.T) {
terraformOptions := terraform.WithDefaultRetryableErrors(t, &terraform.Options{
// Set the path to the Terraform code that will be tested.
TerraformDir: "../",
})
// Clean up resources with "terraform destroy" at the end of the test.
defer terraform.Destroy(t, terraformOptions)
// Run "terraform init" and "terraform apply". Fail the test if there are any errors.
terraform.InitAndApply(t, terraformOptions)
// Run `terraform output` to get the values of output variables and check they have the expected values.
output := terraform.Output(t, terraformOptions, "hello_world")
assert.Equal(t, "Hello, World!", output)
}
- Run below command inside test folder:
go test -v
6. Check the output.
Output
This code does all the steps from terraform init, terraform apply, reading the output variable using terraform output, checking its value as we expect, and running terraform destroy to run it at the end of the test, whether the test succeeds or fails. Output truncated for readability:

For more examples, please find the link in reference below.
Reference
Security Scanning
Identifying security vulnerabilities or misconfigurations in Terraform code to enhance security posture.
terrascan
Security scanning is a critical aspect of ensuring the integrity and security of your infrastructure code and cloud environments. terrascan and pike
terrascan
Terrascan, an open-source tool developed by Accurics, has emerged as a powerful solution for scanning Terraform code and identifying security vulnerabilities and best practice violations.
Features
- Terrascan offers an extensive rule set covering security best practices and compliance standards, addressing issues in access controls, encryption, networking, and critical areas for a holistic IaC security approach.
- Terrascan supports AWS, Azure, Google Cloud, and Kubernetes, providing versatility for organizations with diverse cloud environments and ensuring a consistent security posture across different platforms.
- Terrascan enables real-time scanning of Terraform configurations, allowing developers and operators to identify security issues before infrastructure provisioning, taking a proactive approach to prevent potential vulnerabilities in the production environment.
- Terrascan supports flexible output formats, including JSON. This adaptability enables easy integration into various reporting and alerting systems, facilitating the consumption of scan results and timely actions by development and operations teams.
Installation
Refer the GitHub link – terrascan
Implementation
- Create a terraform configuration files for creating the required resources. (Feel free to copy the files from this repository for learning purposes.)
- Run
terrascan scanto scan the code.
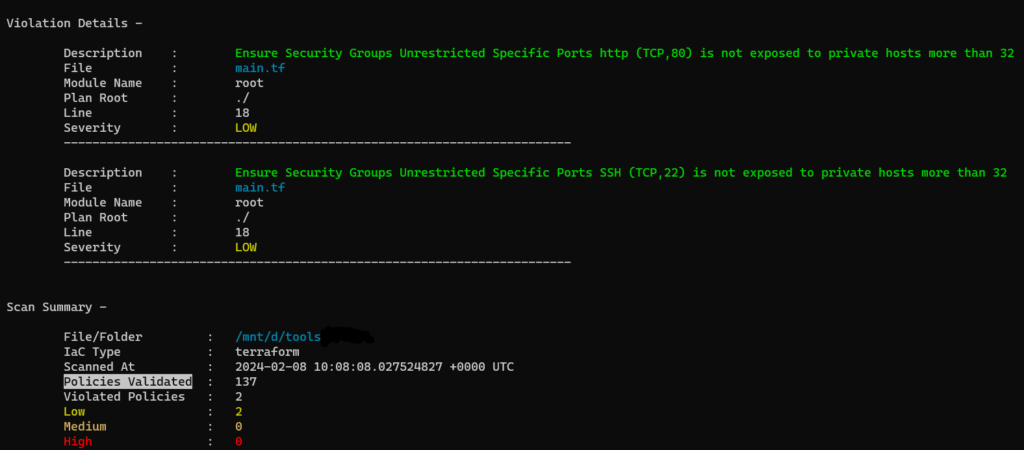
3. Run terrascan scan -v to get the output with rule id which will be used in skip check.
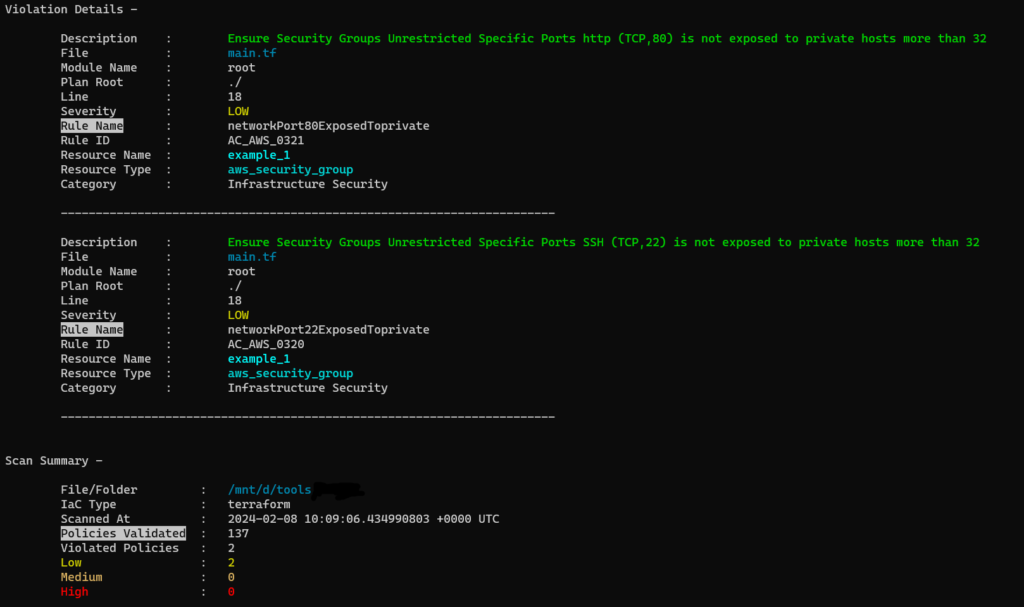
5. For skipping rule checks, use this format#ts:skip=<rule id><skip reason> in the configuration file at required place. In the below example, ingress rule for port 80 is skipped.
rule_id will be in the output of terrascan scan -v command.
Example:
					resource "aws_security_group" "example_1" {
  name        = "example_1"
  description = "Allow inbound traffic on port 80 and 22"
	#ts:skip=AC_AWS_0321 need to skip this rule
  ingress {
    from_port   = 80
    to_port     = 80
    protocol    = "tcp"
    cidr_blocks = ["10.0.0.0/16"]
    description = "inbound rule for HTTP"
  }

  ingress {
    from_port   = 22
    to_port     = 22
    protocol    = "tcp"
    cidr_blocks = ["10.0.0.0/16"]
    description = "inbound rule for SSH"
  }
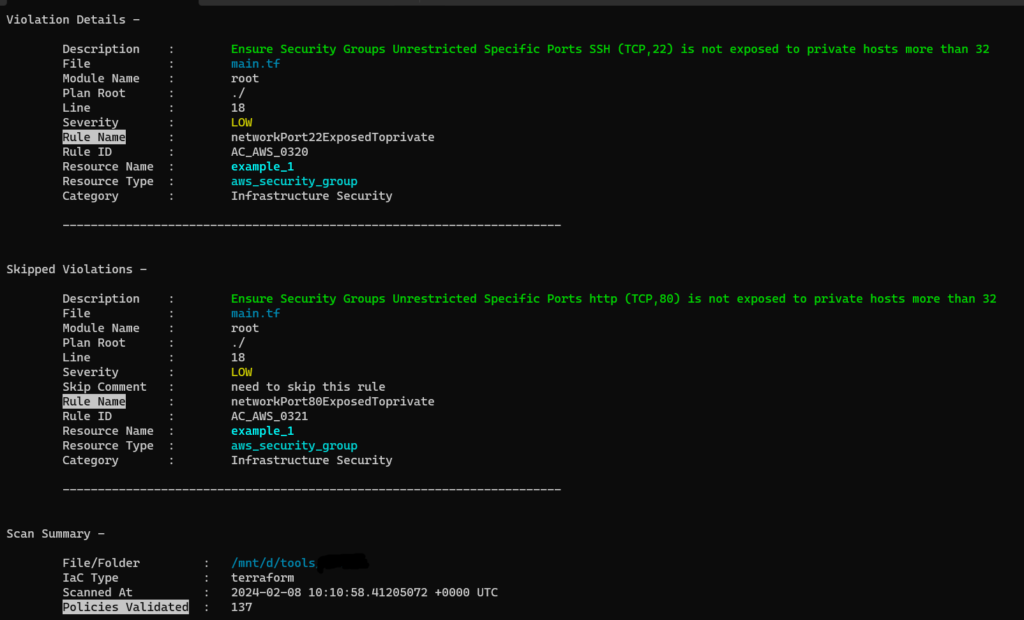
Reference
State Inspection and Visualization
Analyzing and visualizing Terraform state files to understand the current infrastructure configuration.
					terraform-visual
terraboard
inframap
prettyplan
State inspection involves examining the current state of provisioned infrastructure resources managed by IaC tools like Terraform. This includes details such as resource attributes, dependencies, configurations, and relationships. State visualization tools offer graphical representations of infrastructure resources, dependencies, and relationships. Visualizations may include diagrams, graphs, or charts that illustrate the structure and topology of deployed resources.
terraform-visual
It is an open-source tool that generates graphical visualizations of Terraform plan. It creates interactive diagrams that illustrate the relationships between resources and modules defined in Terraform code.
Features
- It generates graphical diagrams representing the infrastructure defined in Terraform plan. These diagrams showcase the relationships between resources and modules.
- The generated diagrams are interactive, allowing users to explore and navigate the infrastructure visually. Users can click on resources to view details and understand dependencies.
- It illustrates connections between resources and modules, providing insights into how different components of the infrastructure interact.
Installation
Using Yarn yarn global add @terraform-visual/cli
Using NPM npm install -g @terraform-visual/cli
Implementation
We can use terraform-visual in CLI and Browser.
- Using Browser:
a. Generate terraform plan in JSON format,
					terraform plan -out=plan.out
terraform show -json plan.out > plan.json
b. Upload the terraform JSON file in terraform-visual and submit.
- Using CLI:
a. Generate terraform plan in JSON format
					terraform plan -out=plan.out
terraform show -json plan.out > plan.json
b. Create Terraform Visual Report terraform-visual --plan plan.json
c. Open the Report terraform-visual-report/index.html
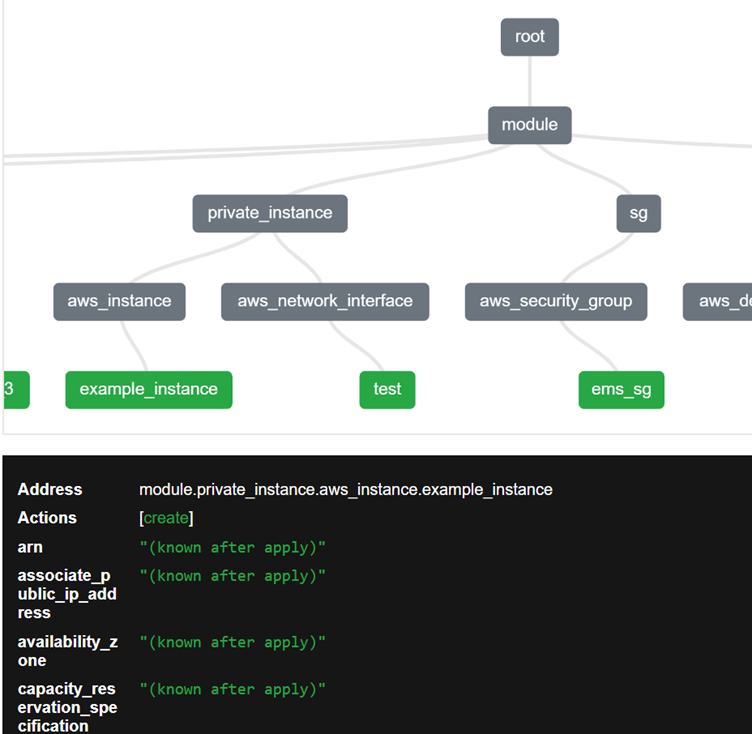
In the above output, details of modules will be shown below, when the pointer is moved to different modules/resources.
Reference
inframap
Inframap is a powerful solution for visualizing infrastructure defined in Terraform. It acts as a bridge between intricate Terraform code and a comprehensive visual representation, offering users a bird’s-eye view of their infrastructure.
Features
- It has the ability to automatically generate visual maps from Terraform code.
- Inframap employs a color-coded approach to visually distinguish between different types of resources and their dependencies.
- The tool organizes the visual map in a hierarchical manner, allowing users to navigate through the layers of infrastructure components.
Installation
- Find the Latest Releases: https://github.com/cycloidio/inframap/releases/
- Run below commands,
					 wget https://github.com/cycloidio/inframap/releases/download/v0.6.7/inframap-linux-amd64.tar.gz
 tar -xf inframap-linux-amd64.tar.gz
 sudo install inframap-linux-amd64 /usr/local/bin/inframap
Implementation
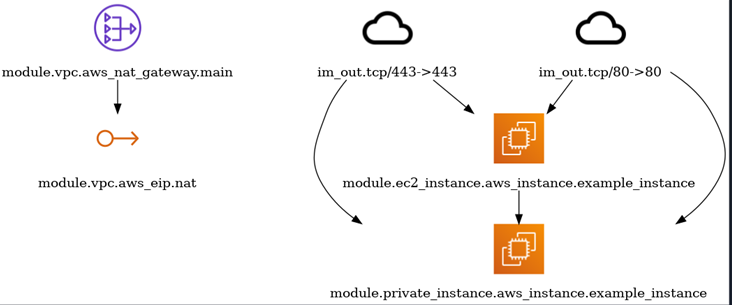
Create a terraform configuration files. Run terraform apply, state file will be generated with .tfstate extension. Then run the below command in same directory with correct .tfstate file name,
inframap generate state.tfstate | dot -Tpng > graph.png
Reference
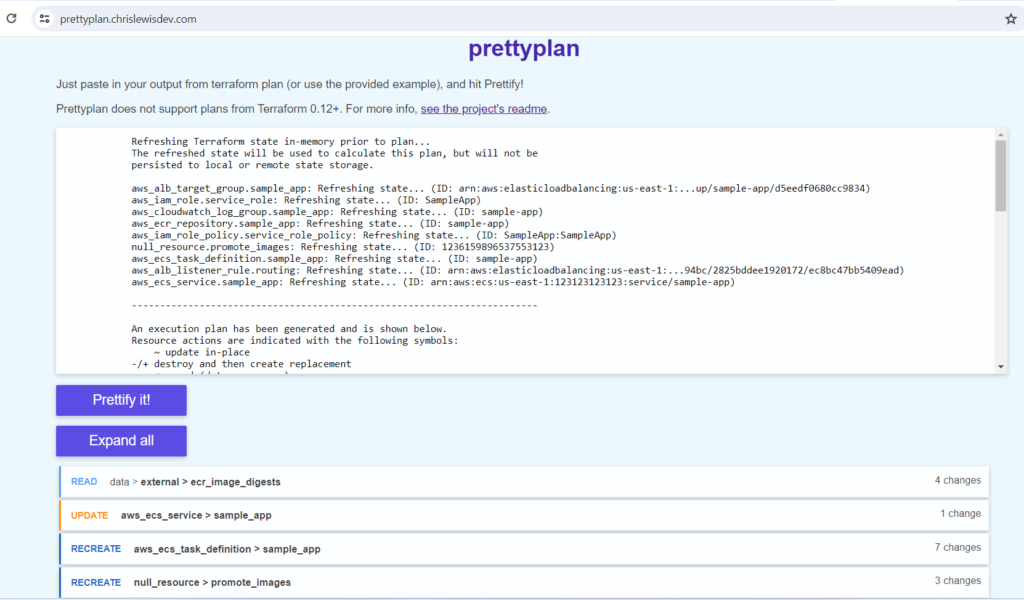
prettyplan
Prettyplan is a small tool to help you view large Terraform plans with ease. By pasting in your plan output, it will be formatted for:
- Expandable/collapsible sections to help you see your plan at a high level and in detail
- Tabular layout for easy comparison of old/new values
- Better display formatting of multi-line strings (such as JSON documents)
It is available online at prettyplan.
Version compatibility with terraform
Prettyplan was written to work on Terraform plans from 0.11 and earlier. In 0.12, the plan output was significantly changed, addressing many of the main points that Prettyplan addresses. so Prettyplan does not support plans from Terraform 0.12+.
Implementation
- Open the prettyplan and paste your output of terraform plan.
- click prettify it and output will be generated.
Reference
Infrastructure State Management
To detect and manage infrastructure drift in cloud environments, including those managed by Terraform.
driftctl
The tool involves in effective handling, tracking, and synchronization of the state of provisioned infrastructure with its corresponding configuration. One of the tool for managing infrastructure state is driftctl
driftctl
In dynamic cloud environments, continuous changes occur due to updates, manual interventions, or external factors. These changes may lead to a misalignment between the declared infrastructure state and the live environment, creating what is known as infrastructure drift. Drift introduces complexities in configuration management, compliance, and security.
Driftctl addresses the challenge of drift by providing a systematic way to detect, analyze, and report on discrepancies between IaC definitions (Terraform, in particular) and the actual cloud infrastructure. Driftctl scans and compares the deployed resources with the declared state, allowing teams to identify and rectify drift efficiently.
Features
- Driftctl seamlessly integrates with Terraform, a popular IaC tool. It leverages Terraform’s state files to understand the desired infrastructure state, making it a valuable addition to Terraform-based workflows.
- The core functionality of Driftctl lies in its ability to detect drift. It scans the live environment and compares it against the Terraform state, highlighting discrepancies such as resource modifications, additions, or deletions.
- Driftctl provides detailed reports that pinpoint the specific resources affected by drift. These reports include actionable insights, enabling teams to understand the extent of drift and take corrective actions promptly.
Installation
For Linux,
- Run below commands,
					curl -L https://github.com/snyk/driftctl/releases/latest/download/driftctl_linux_amd64 -o driftctl
chmod +x driftctl
sudo mv driftctl /usr/local/bin/
- Verify digital signatures: Download binary, checksums and signature
					curl -L https://github.com/snyk/driftctl/releases/latest/download/driftctl_linux_amd64 -o driftctl_linux_amd64
curl -L https://github.com/snyk/driftctl/releases/latest/download/driftctl_SHA256SUMS -o driftctl_SHA256SUMS
curl -L [https://github.com/snyk/driftctl/releases/latest/download/driftctl_SHA256SUMS.gpg -o driftctl_SHA256SUMS.gpg](https://github.com/snyk/driftctl/releases/latest/download/driftctl_SHA256SUMS.gpg%20-o%20driftctl_SHA256SUMS.gpg)
- Import Key
gpg --keyserver hkps://keys.openpgp.org --recv-keys 65DDA08AA1605FC8211FC928FFB5FCAFD223D274
- Verify signature
gpg --verify driftctl_SHA256SUMS.gpg driftctl_SHA256SUMS
- Verify checksum
sha256sum --ignore-missing -c driftctl_SHA256SUMS
For other OS, refer link to install
Implementation
- Create a terraform configuration files for creating the required resources. (Feel free to copy the files from this repository for learning purposes.)
- Initialize the Terraform configuration and apply the configuration files.
terrafotm init
terraform apply
With a local state, use the command
driftctl scanFrom the output we can observe that, all the resources in a given region of cloud which is managed and not managed in the state file is shown. Also, if any resource in the state file is deleted in the cloud, that resource also will be in output.Find more usage of driftctl with remote state at driftcl_scan
Some people do not have the goal of reaching a 100% IAC coverage with their infrastructure. For this use case, generate .driftignore file.
driftctl scan -o json://stdout | driftctl gen-driftignore
Find some more commands at .driftignore
- Output of
driftctl scanafter .driftignore file,
Reference
Infrastructure Management and Collaboration
Collaborating with teams to manage and automate infrastructure provisioning and management.
					terragrunt
atlantis
terramate
Infrastructure Management and Collaboration Tools are specialized platforms or utilities designed to streamline and automate various aspects of the Terraform workflow, from development to deployment and beyond. These tools provide capabilities to enhance collaboration, efficiency, and reliability in managing infrastructure as code (IaC) with Terraform. These tools integrate seamlessly with version control systems (VCS) such as Git, GitHub, GitLab, or Bitbucket.
atlantis
Atlantis is an application for automating Terraform via pull requests. It is deployed as a standalone application into your infrastructure. No third-party has access to your credentials. Atlantis listens for GitHub, GitLab or Bitbucket webhooks about Terraform pull requests. It then runs terraform plan and comments with the output back on the pull request. When you want to apply, comment atlantis apply on the pull request and Atlantis will run terraform apply and comment back with the output.
Features
- When everyone is executing Terraform on their own computers, it’s hard to know the current state of your infrastructure. With Atlantis, everything is visible on the pull request. You can view the history of everything that was done to your infrastructure.
- You probably don’t want to distribute Terraform credentials to everyone in your engineering organization, but now anyone can open a Terraform pull request. You can require approval before the pull request is applied so nothing happens accidentally.
- You can’t fully review a Terraform change without seeing the output of terraform plan. Now that output is added to the pull request automatically.
- Atlantis locks a directory/workspace until the pull request is merged or the lock is manually deleted. This ensures that changes are applied in the order expected.
Installation
Download Atlantis: The latest release available at https://github.com/runatlantis/atlantis/releases. Download and unpackage it.
Download ngrok: It is a tool that forwards your local port to a random public hostname. Atlantis needs to be accessible somewhere that github.com or gitlab.com or bitbucket.org or your GitHub or GitLab Enterprise installation can reach.
a. Download ngrok at https://ngrok.com/download and unzip it.
b. Signup/login to https://ngrok.com/ and get the token from left side pane
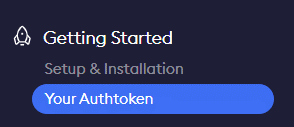
c. Give the below command to configure the copied token in above step:
ngrok config add-authtoken
d. Run the below command and note the forwarding URL,(Don’t close the window)
					ngrok http 4141
ex: https://b52r-52-31-0-174.ngrok-free.app

Create a random string: Use the link random string generator and copy one string from it.
Generate Personal Access Token in GitHub:
a. In the upper-right corner of Github page, click your profile photo, then click Settings.
b. Click developer settings in left pane.
c. Click person access tokens in left pane and click tokens(classic).
d. Click generate new token and select generate new token(classic).
e. Give the description and set the expiration date.
f. Select the repo scope and click generate token.
g. Copy the generated token.
For token generation reference, link.
- Create start.sh file in local with the below script,
					#!/usr/bin/bash
URL=" https://b52r-52-31-0-174.ngrok-free.app"  #forwarding URL generated at step 2
SECRET="4j8YAiLG0c"  #random string generated at step 3
TOKEN="ghp_TX9PhGU336aopTN39F26f"  #Token generated at step
USERNAME="git-username"  # GitHub username
REPO_ALLOWLIST="github.com/git-username/repo_name"

atlantis server \
--atlantis-url="$URL" \
--gh-user="$USERNAME" \
--gh-token="$TOKEN" \
--gh-webhook-secret="$SECRET" \
--repo-allowlist="$REPO_ALLOWLIST"
- Without closing the terminal at step 2, open a new terminal and run the start.sh file,
./start.sh

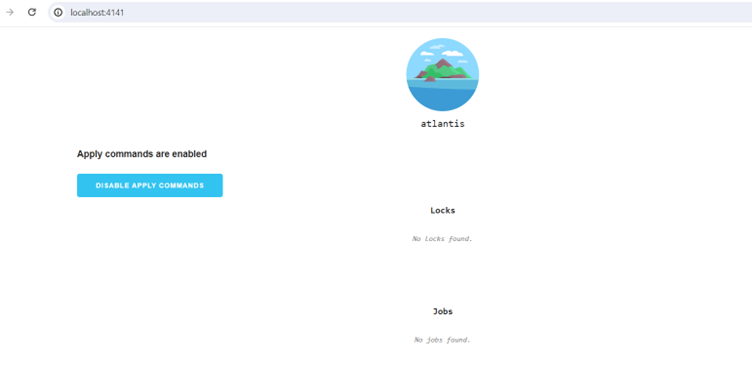
Now the application will run on port 4141.
- Create a webhook for GitHub:
a. Go to repo settings and select Webhooks in the sidebar. Then click add webhook.
b. In the payload URL, enter the forwarding url in step 2 with /events at the end (ex.: https://b52r-52-31-0-174.ngrok-free.app/events)
c. Select application/json in the content type.
d. In secret, give the random string generated in step 3.
e. In Which events would you like to trigger this webhook?, select Let me select individual events. Check the boxes as below,
Pull request reviews Pushes Issue comments Pull requests
f. Leave the active checked, click Add webhook. check the webhook is working.
Implementation
Create terraform configuration files with resource creation in local git repo, then commit and push the changes to new branch in git repo.
In GitHub, Create a pull request to merge to main branch. In comment, give atlantis commands like,
atlantis plan,atlantis apply,atlantis unlock
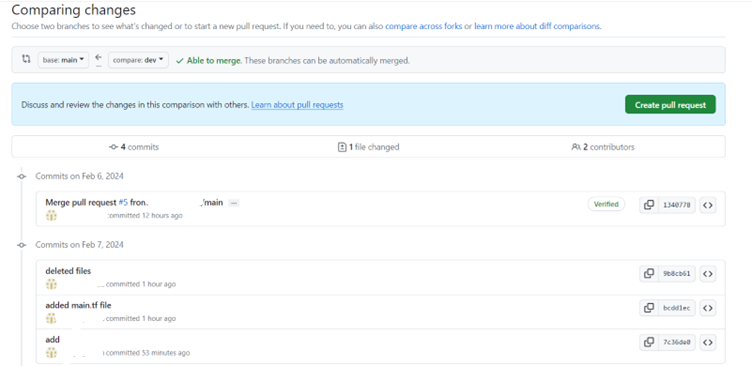
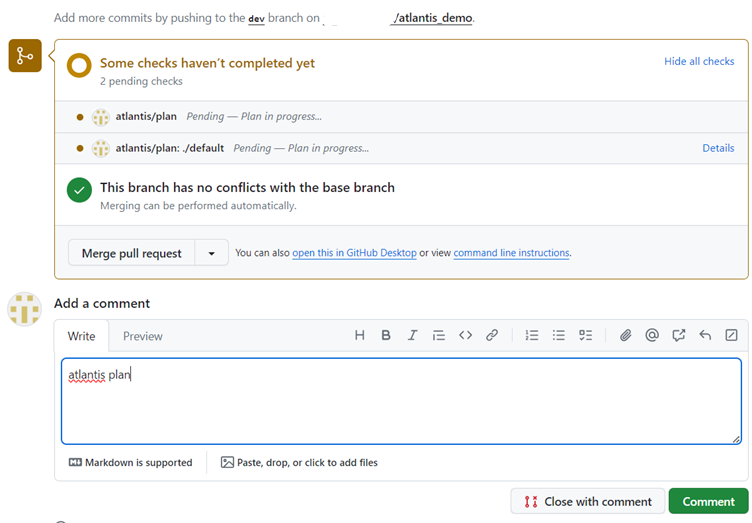
- As a result of above step you can see the output for each command.
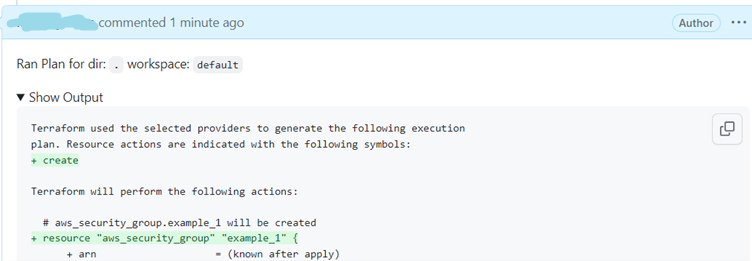
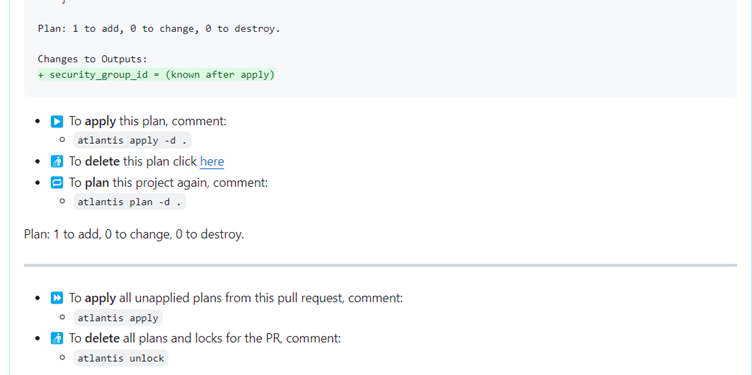
- If
atlantis applyis given the resource is generated as in terraform configuration.
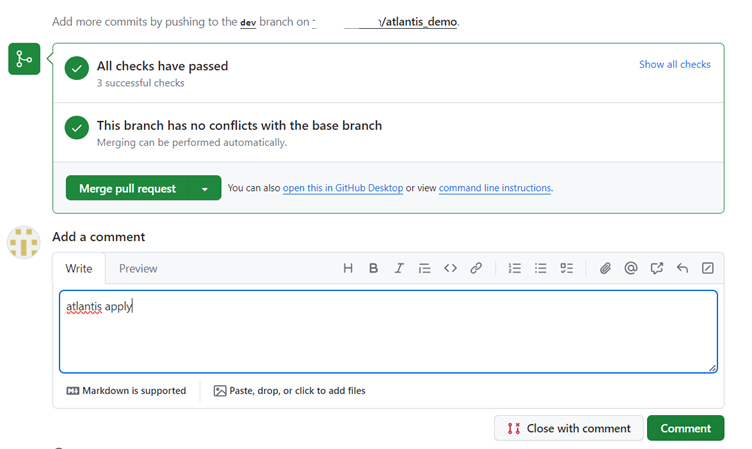
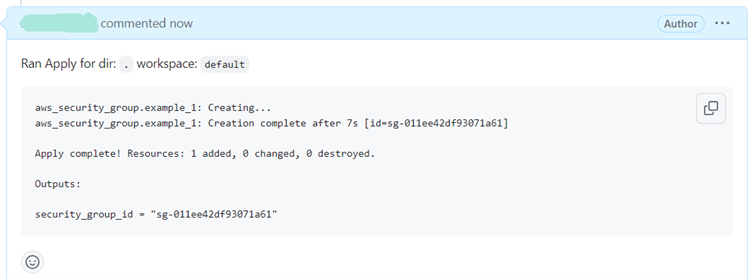
- The output of step 3 and 4 can be seen in the application running on port 4141(http:localhost:4141)
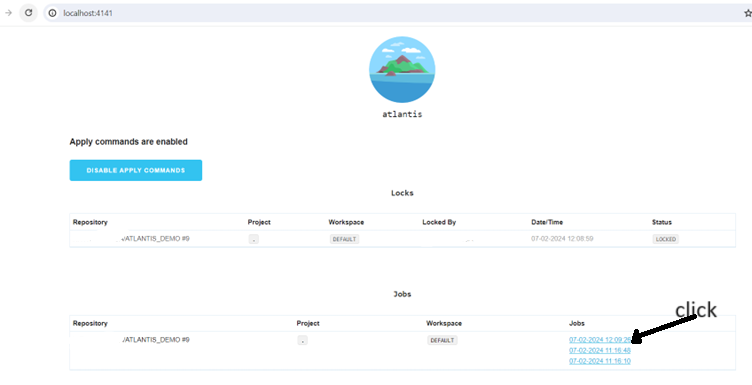
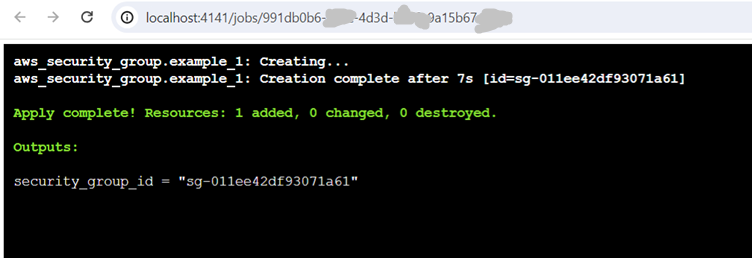
Click on the jobs to view the output as below,
Refer the Links: pre work flow, post work flow for integrating other tools in the work flow.
Reference
terragrunt
Terragrunt is a thin wrapper for Terraform that provides extra tools for keeping Terraform configurations DRY (Don’t Repeat Yourself), managing remote state, and configuring remote Terraform operations.
terragrunt.hcl is a configuration file used by Terragrunt. It provides additional features and simplifying the management of Terraform configurations. The terragrunt.hcl file is where you define settings, variables, and other configurations specific to Terragrunt. It allows you to control how Terragrunt interacts with Terraform and customize the behavior of your infrastructure deployments.
Features
- Keep your backend configuration DRY.
- Keep your provider configuration DRY.
- Keep your Terraform CLI arguments DRY.
- Promote immutable, versioned Terraform modules across environments.
Installation
Refer the link – terragrunt_install
Implementation
Let us try to implement Keep your Terraform CLI arguments DRY
Create a main.tf file with below content for example purpose,
					provider "aws" {
  region = var.aws_region
  profile = var.profile
}

# variables.tf
variable "account_id" {}
variable "account_bucket" {}
variable "aws_region" {}
variable "profile" {}

resource "aws_s3_bucket" "example_bucket" {
  bucket = "my-example-bucket"
  # Optional: Add tags to the bucket
  tags = {
    Name        = "My Example Bucket"
    Environment = "Test"
  }
}
when you run terraform plan or terraform apply for above configuration file, values are asked at runtime as no value is provided for variables.

- Values of account-level variables in an common.tfvars file:
					# common.tfvars
account_id     = "012365478901"
account_bucket = "my-bucket"
- Values of region-level variables in a region.tfvars file:
					# region.tfvars
aws_region = "us-east-1"
profile = "my-profile"
Everytime when running terraform plan commands, use the above variables using the -var-file argument.
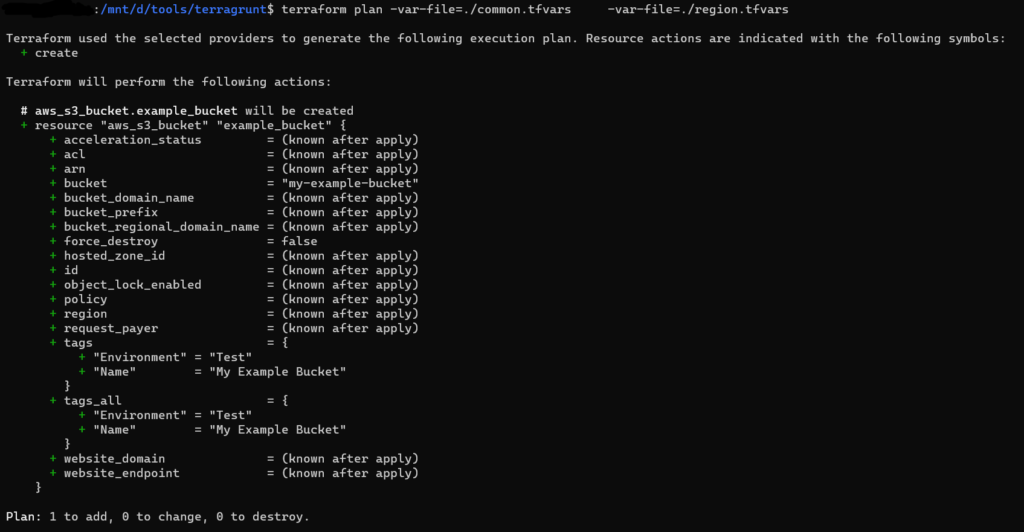
- Terragrunt allows you to keep your CLI arguments DRY by defining those arguments as code in your
terragrunt.hclconfiguration:
					# terragrunt.hcl
terraform {
  extra_arguments "common_vars" {
    commands = get_terraform_commands_that_need_vars()

    arguments = [
      "-var-file=./common.tfvars",
      "-var-file=./region.tfvars"
    ]
  }
}
get_terraform_commands_that_need_vars() is a built-in function to automatically get the list of all commands that accept -var-file and -var arguments
- Now, when you run the
terragrunt planorterragrunt applycommands, Terragrunt will automatically add those arguments.
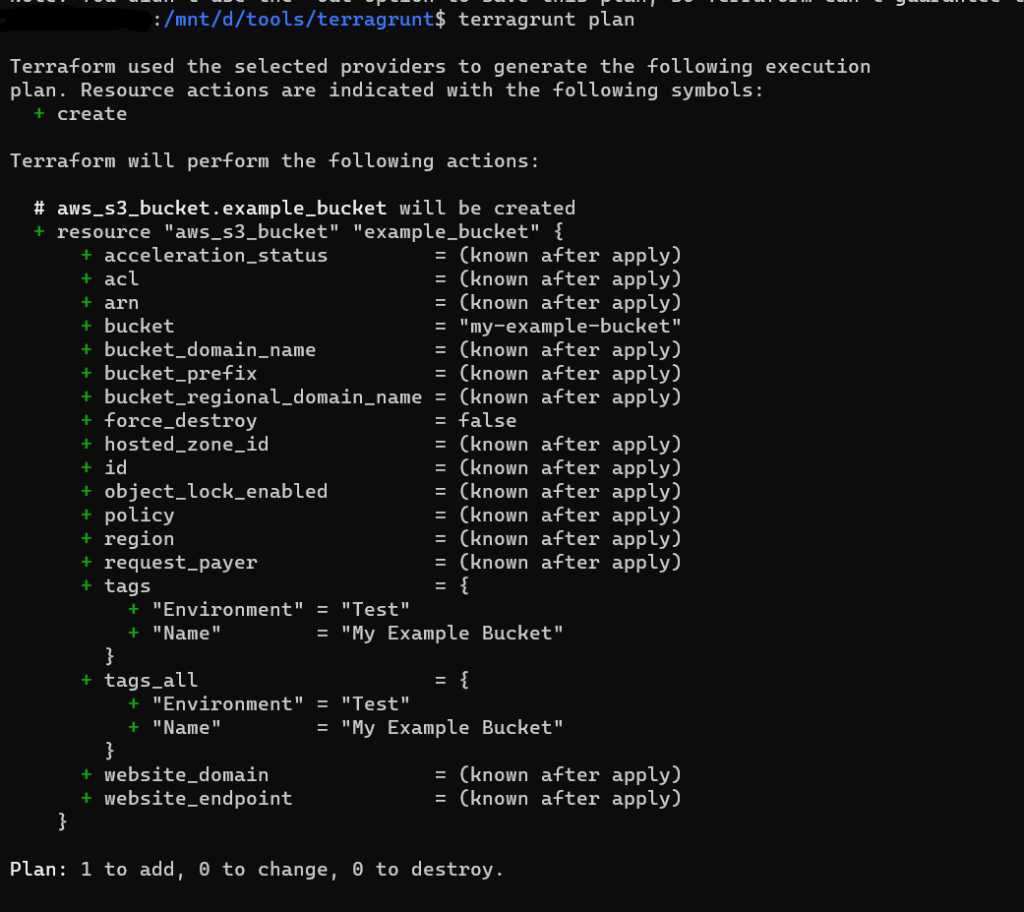
To try more features, refer the link in reference section.
Reference
Migration and Import Tools
Tools for migrating existing infrastructure or importing resources into Terraform configurations for management.
					tfmigrate
tfmigrator
Migration and Import Tools, such as tfmigrate and tfmigrator , play a crucial role in transitioning existing infrastructure to Terraform-managed environments and importing existing resources into Terraform state.
tfmigrate
Tfmigrate is a Terraform state migration tool. It improves Terraform’s state management by allowing users to write state move (mv), remove (rm), and import commands in HCL, enabling them to plan and apply changes in a structured, version-controlled manner.
Features
- Move resources to other tfstates to split and merge easily for refactoring – Monorepo style support.
- Simulate state operations with a temporary local tfstate and check to see if terraform plan has no changes after the migration without updating remote tfstate – Dry run migration.
- Keep track of which migrations have been applied and apply all unapplied migrations in sequence – Migration history.
Installation
For Linux,
- Latest compiled binaries at – releases
- Run below commands,
					curl -L https://github.com/minamijoyo/tfmigrate/releases/download/v0.3.20/tfmigrate_0.3.20_linux_amd64.tar.gz > tfmigrate.tar.gz
tar -xf tfmigrate.tar.gz tfmigrate && rm tfmigrate.tar.gz
sudo install tfmigrate /usr/local/bin && rm tfmigrate
tfmigrate --version
Implementation
Create a terraform configuration files for creating the required resources. (Feel free to copy the files from this repository for learning purposes.)
Initialize the Terraform configuration and create the infrastructure.
resource "aws_security_group" "changed" { }terrafotm init
terraform apply
Check with
terraform state listcommand.Now rename the resource name in main.tf file as
resource "aws_security_group" "example" { }There is a difference in main.tf file and tfstate file. If checked with
terraform plancommand.
- Now create a configuration file tfmigrate_test.hcl with below content,
					migration "state" "test" {
actions = [
"mv aws_security_group.changed aws_security_group.example",
]
}
- Run below commands,
					tfmigrate plan tfmigrate_test.hcl
tfmigrate apply tfmigrate_test.hcl
- Now check the state file for the resource name or check with the below commands for changes,
					Terraform plan
Terraform state list
Here, there is no change in state file and configuration file, so no change in terraform plan
Reference
tfmigrator
Go library to migrate Terraform Configuration and State with terraform state mv and terraform state rm command and hcledit.
Features
Prior to applying changes, TFMigrator offers a “dry run” mode. This allows users to preview the modifications and assess their impact on the Terraform codebase, minimizing the risk of unintended consequences.
Installation
For Linux,
- Compiled binaries available at tfmigrator_releases.
- Run below commands,
					curl -L https://github.com/tfmigrator/cli/releases/download/v0.2.2/tfmigrator_linux_amd64.tar.gz >tfmigrator.tar.gz
tar -xf tfmigrator.tar.gz tfmigrator && rm tfmigrator.tar.gz
sudo install tfmigrator /usr/local/bin && rm tfmigrator
tfmigrator
Implementation
Create a terraform configuration files for creating the required resources. (Feel free to copy the files from this repository for learning purposes.)
Initialize the Terraform configuration and create the infrastructure.
resource "aws_security_group" "example" { }terraform init
terraform apply
Create a tfmigrator.yaml file with below content,
					version: 0.13  # Specify the Terraform version you are migrating to
path: ./
rules:
- if: Resource.Address == "aws_security_group.example"
  address: aws_security_group.changed
- Now run the below command and observe changes in the main.tf and tfstate file
tfmigrator run main.tf
Output
In main.tf and tfstate files, the resource name aws_security_group.example is changed to aws_security_group.changed
Reference
Permission Management Tool
These tools are particularly crucial in modern cloud-based environments where access to resources must be carefully managed to ensure security and compliance.
pike
These tools are particularly crucial in modern cloud-based environments where access to resources must be carefully managed to ensure security and compliance.
pike
Pike is an interesting tool that will analyze the resources you wish to create using Terraform and generate the necessary IAM permissions you need to complete that deployment. It determines the minimum permissions required to run terraform. Pike currently supports Terraform and supports multiple providers (AWS, GCP, AZURE).
Installation
Refer the GitHub link – pike
Implementation
- Create a terraform configuration files for creating the required resources. (Feel free to copy the files from this repository for learning purposes.)
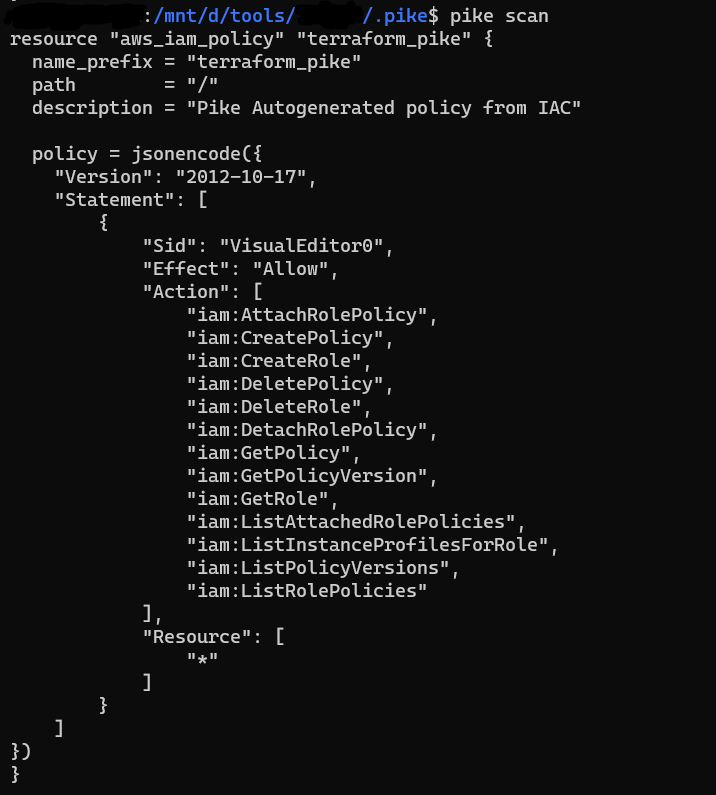
- To scan a directory containing Terraform files –
pike scan
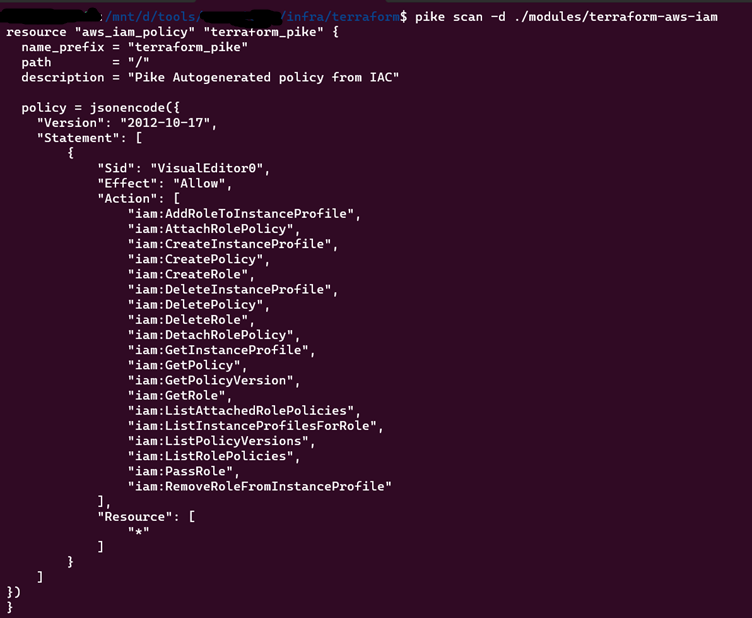
- To scan a specific directory of terraform files –
pike scan -d ./modules/terraform-aws-iam
Note: For this you need to create the configuration files in the path /modules/terraform-aws-iam
- For writing the output to .pike folder, use -w flag –
pike scan -w
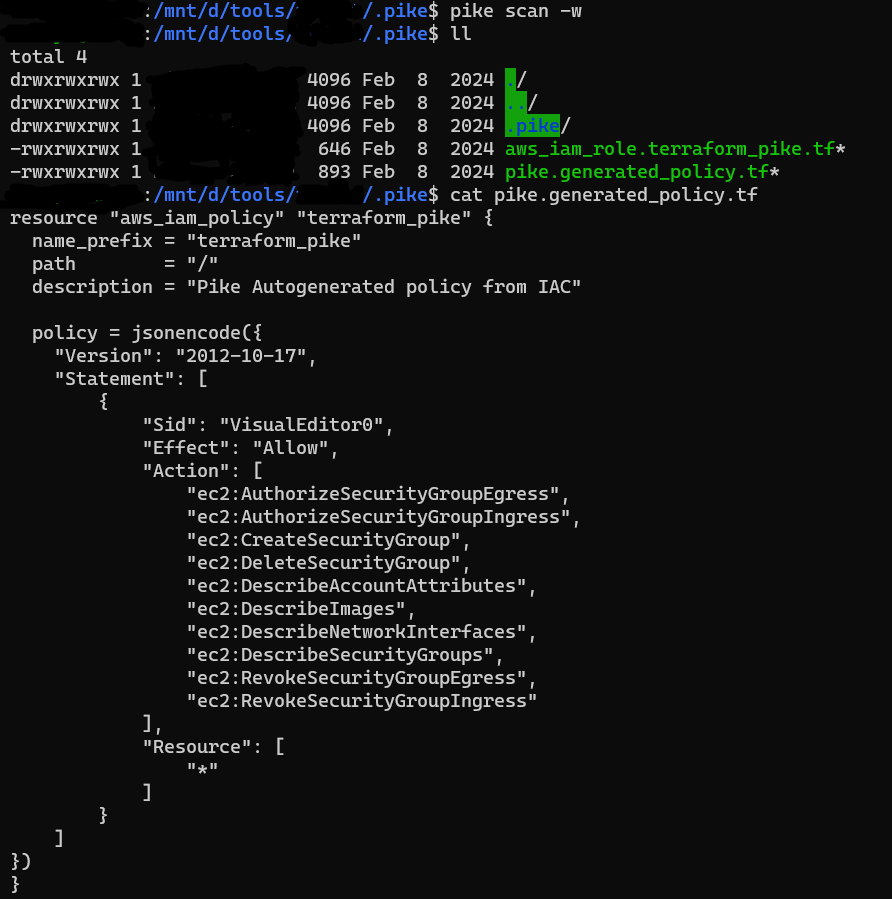
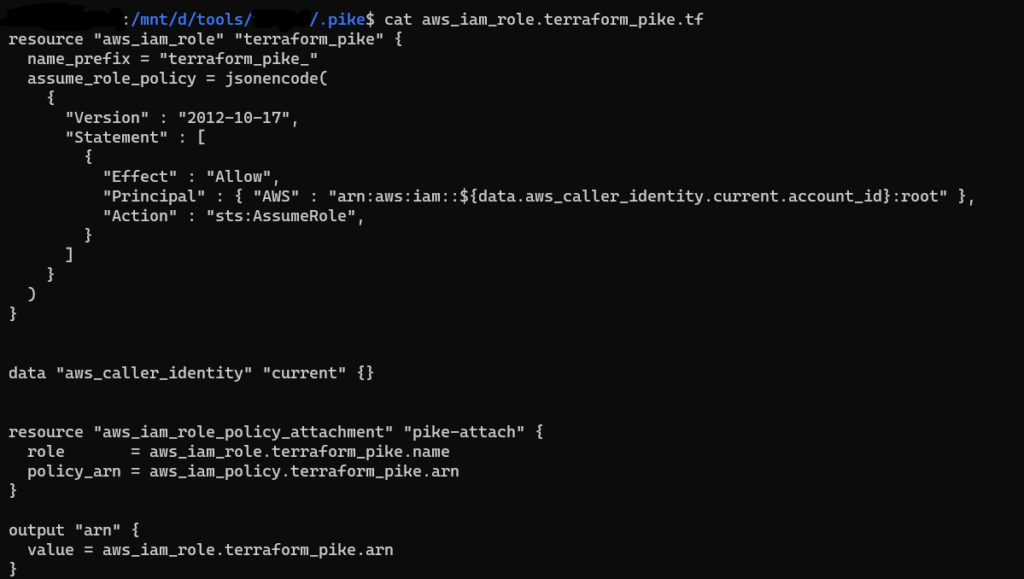
You can now deploy the policy you need directly (AWS only so far) and in aws console we can see the generated policy.
pike make -d ./modules/folder_name
Reference
Infrastructure Importer from Cloud Resources
This categorization emphasizes Terraformer’s role in streamlining the process of transitioning existing infrastructure into Terraform-managed infrastructure, enabling users to adopt infrastructure as code practices more efficiently.
terraformer
This categorization emphasizes Terraformer’s role in streamlining the process of transitioning existing infrastructure into Terraform-managed infrastructure, enabling users to adopt infrastructure as code practices more efficiently.
terraformer
Terraformer is a powerful command-line interface (CLI) tool designed to facilitate the generation of Terraform files (tf/json and tfstate ) from existing infrastructure. (reverse Terraform)
Features
- Terraformer can generate Terraform configuration files (tf or json) and state files (tfstate) from the existing infrastructure across various cloud providers.
- Terraformer supports the extraction of information for all supported objects/resources from the existing cloud infrastructure.
- Terraformer creates connections between resources using terraform_remote_state, allowing resources to reference information from other resources.
- Terraformer allows users to define a custom folder tree pattern for organizing the generated Terraform files.
- Terraformer enables users to import existing infrastructure by specifying the resource name and type.
Installation
- This installs all providers, set
PROVIDERto one ofgoogle,awsorkubernetesif you only need one. - Linux
					export PROVIDER=all
curl -L "https://github.com/GoogleCloudPlatform/terraformer/releases/download/0.8.24/terraformer-${PROVIDER}-linux-amd64"
chmod +x terraformer-${PROVIDER}-linux-amd64
sudo mv terraformer-${PROVIDER}-linux-amd64 /usr/local/bin/terraformer
For other OS, click – Terraformer_install
Implementation
- Create a working folder and initialize the Terraform provider plugin. This folder will be where you run Terraformer commands. Run
terraform initagainst aversions.tffile to install the plugins required for your platform. For example, if you need plugins for the aws provider,versions.tfshould contain:
					terraform {
  required_providers {
    aws = {
      source = "hashicorp/aws"
    }
  }
  required_version = ">= 0.13"
}
- In CLI, run the below command with configured profile and required region, resources:
terraformer import aws --resources=vpc,subnet --connect=true --regions=eu-west-1 --profile=my-profile

- The tf and tfstate files will be in the path /generated/aws/resource_name/*.tf from current folder.

- In the generated configuration files, run
terraform initandterraform plan, there will be no difference in current state and resources in cloud providers. Thus, using terraformer we can generate configuration files from existing infrastructure.
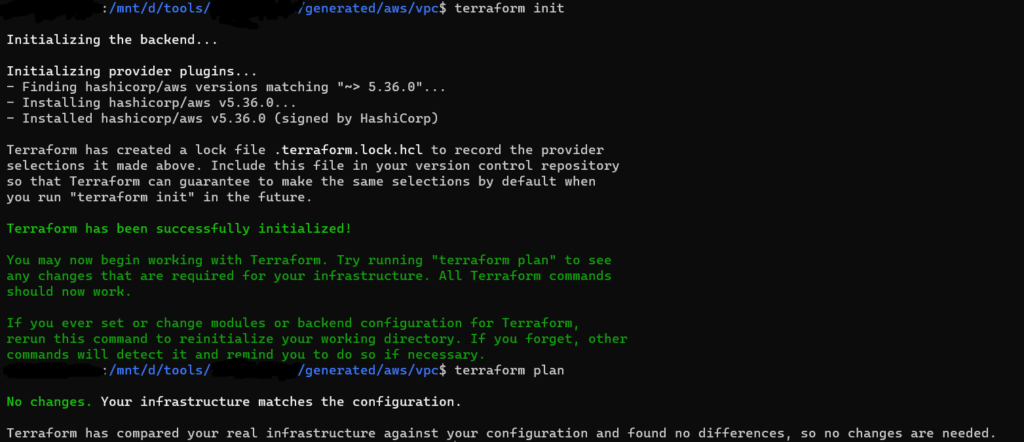
To explore more options using aws cloud refer AWS_Import_options and for other providers, please refer the reference link below.
Reference
We highly appreciate your patience and time spent reading this article.
Stay tuned for more Content.
Happing reading !!! Let us learn together !!!


