Table of Contents
Overview
In this blog post, will be implementing the terraform workflow with GitHub Actions to provision the infrastructure resources in AWS Cloud Platform
Getting Started
To get started , there are some pre-requisites to deal with such as
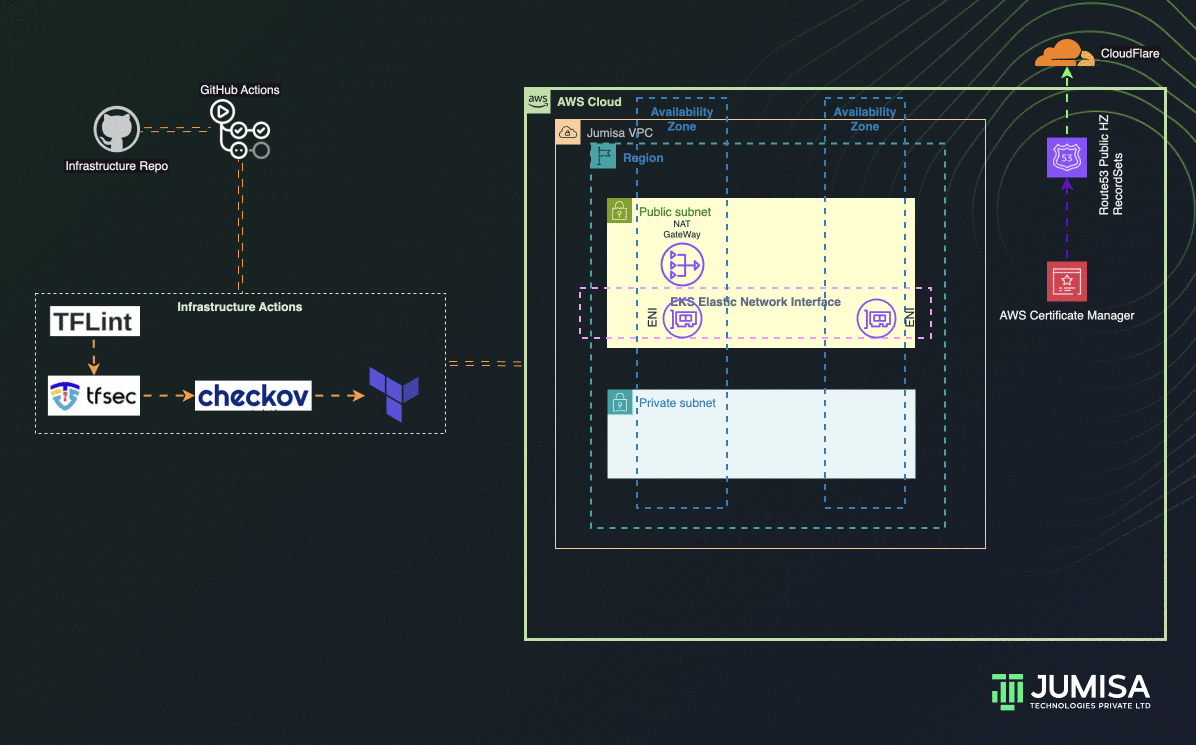
AWS User Account
For terraform to provision / read any data / resources on AWS. It needs to have access which is done via IAM User and Role.
- Create an IAM user : (https://docs.aws.amazon.com/IAM/latest/UserGuide/id_users_create.html), enabled programmatic access
- Attach an IAM Role : (https://docs.aws.amazon.com/directoryservice/latest/admin-guide/assign_role.html) that has access to create, modify and delete AWS Resources
- Create an access id and secret key : (https://docs.aws.amazon.com/IAM/latest/UserGuide/id_credentials_access-keys.html)
Cloudflare API Token
To generate an API token on Cloudflare
- Login to Cloudflare : https://dash.cloudflare.com/
- Click on the domain (in my case jumisa.io) from home page, navigate to Overview page of the domain
- Click on the link Get your API Token placed below Account ID
- Then API Tokens page will be displayed, click on Create Token under User API Tokens
- Then there will be list of templates displayed, choose the Edit zone DNS and click on Use Template
- Once the template is opened check the permission to be set as Edit for the Zone DNS and Specific zone as jumisa.io (your domain in this case) to be chosen under Zone Resource
- Leave the other as default, click on Continue to summary and in the proceeding page click on Create Token
- As the result, token is generated and displayed like the below. It is one-time copy, please make sure copy the token and store it in your vault. Also use the below curl command to test the token generated
- Finally, when the terraform apply is executed from GitHub Actions , the nameservers for the subdomain created in AWS Route53 will be mapped in Cloudflare domain DNS mapping like below
Setup GitHub Secrets
Terraform needs
- AWS Credentials for working on provisioning resources , reading metadata of any AWS services.
- Cloudflare API Token to create/map AWS Route53 subdomain nameserver to Cloudlfare
So , in the previous steps we have got 3 secrets ie, AWS Access Key ID, Secret Key and Cloudflare Token. These secrets to be added to GitHub repository which will be used in our workflows to get terraform authenticated to AWS and Cloudflare.
GitHub Secrets are managed in 3 levels such as Environment, Repository and Organisation. In our demo, we are going with Repository Secrets.
- Click on the Settings tab from GitHub
- On the left panel under Secret and Variables, click on Actions and then click on New repository secret
- Then add the secrets as shown below. Once the secrets are added , one cannot view it only able to update it from the screen
- Make sure to create all the 3 Secrets
- AWS_ACCESS_KEY_ID
- AWS_SECRET_ACCESS_KEY
- CLOUDFLARE_API_TOKEN
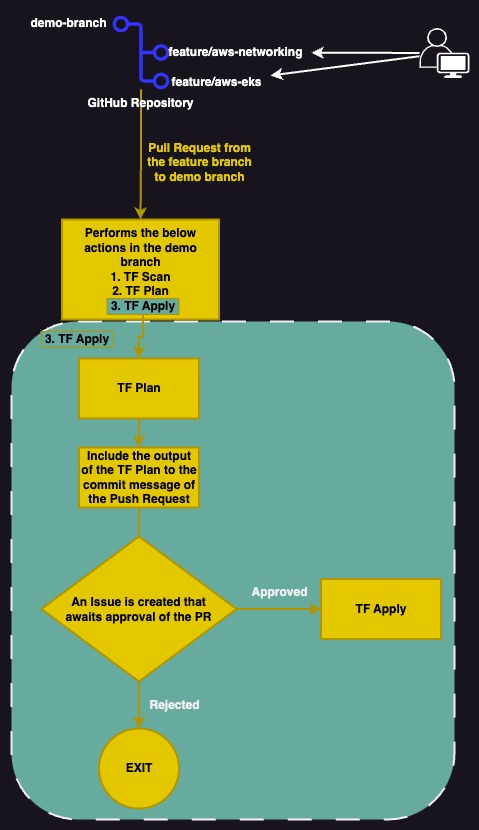
Branching Strategy
At this stage, important thing to work on how we are going to structure our branches for the GitHub Actions workflows. Following a simple branching strategy ie
- One branch by environment
- One branch by feature
Branch by Environment :
Create a branch for infrastructure environment , ie dev, qa, staging, production, etc. These environments are isolated in AWS. In this project, environment is chosen as demo.
So, branch named demo is created , whenever there is a PullRequest to this branch, infrastructure changes (create,update,destroy) that will be carried out AWS.
Branch by Feature:
Create a branch by feature, ie for any specific need/requirement create branch prefixed with feature/. Whenever there is a Push on these feature branches then code scans and infrastructure plan will be generated. For example, in this phase we are building the AWS network resources hence naming the feature branch as feature/aws-network.
Code on Terraform
Terraform block to define the providers , State backend.
- Providers used in this project, which are installed during terraform when they are declared in terraform block under required_providers
- AWS Provider : hashicorp/aws provider renders all the blocks, methods that are necessary to construct / read resources in AWS Cloud Provider
- Cloudflare Provider : cloudflare/cloudflare provider used to add the AWS Hosted Zone’s NameServer to Cloudflare Domain record set
- s3 is configured as backend inorder to store the terraform state file in a bucket
- dynamodb_table to hold the lock for the terraform that controls the collision of simultanous execution of terraform command by multiple source (users/pipelines)
# Create S3 bucket with versioning enabled
aws s3api create-bucket --bucket <> --region us-east-1
aws s3api put-bucket-versioning --bucket <> --versioning-configuration Status=Enabled
# Create DynamoDB table
aws dynamodb create-table \
--table-name <> \
--attribute-definitions AttributeName=LockID,AttributeType=S \
--key-schema AttributeName=LockID,KeyType=HASH \
--provisioned-throughput ReadCapacityUnits=5,WriteCapacityUnits=5
terraform {
required_providers {
aws = {
source = "hashicorp/aws"
version = "~> 5.0"
}
cloudflare = {
source = "cloudflare/cloudflare"
version = "4.11.0"
}
}
required_version = ">=1.2.0"
backend "s3" {
bucket = "<>"
key = "infrastructure/terraform.tfstate"
region = "us-east-1"
encrypt = true
dynamodb_table = "<>"
}
}
provider "aws" {
region = var.region
}
provider "cloudflare" {
api_token = var.cloudflare_api_token
}
Terraform Folder Structure
- terraform plan, apply and destroy uses this file .auto.tfvars by default to execute if there is no values for the variables are defined under variables.tf
- As there is only one vpc and shared resources are in this project , workspace concept is not implemented
region = "us-east-1"
r53record = {
base_domain="jumisa.io"
sub_domain="demo"
}
name = "eks-demo"
vpc = {
cidr = "10.0.0.0/16"
azs = ["us-east-1a", "us-east-1b"]
public_subnets = ["10.0.32.0/21", "10.0.40.0/21"]
private_subnets = ["10.0.0.0/22", "10.0.4.0/22"]
database_subnets = ["10.0.128.0/23","10.0.130.0/23"]
# Single NAT Gateway, disabled NGW by AZ
enable_nat_gateway = true
single_nat_gateway = true
one_nat_gateway_per_az = false
}
tags ={
"Team" = "DevOps"
"Owner" = "Prabhu"
"ManagedBy" = "Terraform"
"Product" = "Jumisa Demo Project"
}
# cloudflare_api_token = "" Value declared in github secrets
Build AWS Network Resources
In this section we define the AWS Network resources that are to be provisioned in AWS account. Including SSL Ceritficate, Route53 Records sets and mapping nameservers in Cloudflare.
This block provisions AWS VPC, Subnets, Route Table, Routes, NAT Gateway, Internet Gateway, Default Security Group, etc.
Also SSL Certificate and Route53 Public Hosted Zone for *.environment.basedomain. Maps the nameservers of the *.environment.basedomain to Cloudflare basedomain
AWS Network Resources
- Network resources are defined under infrastructure/vpc.tf file.
- Variable values are declared under vpc variable in infrastructure/.auto.tfvars file.
- Using the source module from terraform registry terraform-aws-modules/vpc/aws.
- Used 2 Availability Zones in N. Virginia region
- Enabling public, private and database subnets for the network. (database subnets will be used later in the project when real world 3-tier application is deployed).
- Enabled only one NAT Gateway by disabling NAT Gateway by Availability Zone.
- For High Availability NAT Gateway remove one_nat_gateway_per_az from .auto.tfvars and vpc.tf files
# =============================================== #
# Create VPC Network for EKS Infrastructure
# This module provisions VPC network that includes
# VPC , Subnets, Routes, Route Tables
# Internet Gateway, NAT Gateway
# Subnets - Public, Private and Database
#
# =============================================== #
module "vpc" {
source = "terraform-aws-modules/vpc/aws"
version = "5.4.0"
name = var.name
cidr = var.vpc.cidr
# https://www.davidc.net/sites/default/subnets/subnets.html
azs = var.vpc.azs
public_subnets = var.vpc.public_subnets
private_subnets = var.vpc.private_subnets
database_subnets = var.vpc.database_subnets
# Single NAT Gateway, disabled NGW by AZ
enable_nat_gateway = var.vpc.enable_nat_gateway
single_nat_gateway = var.vpc.single_nat_gateway
one_nat_gateway_per_az = var.vpc.one_nat_gateway_per_az
tags = var.tags
}
Route53 & Cloudflare Mapping
- Route53 Public Hosted Zone and Cloudflare mapping are defined in infrstructure/route53.tf file
- Variable values are declared under r53record variable in infrastructure/.auto.tfvars file.
- Using the source module from terraform registry terraform-aws-modules/route53/aws//modules/zones.
- Using module defaults as all the default values are going to provision Public Hosted Zone. In case of Private Hosted Zone and VPC Mapping , have to mention it explicitly. Will be covering it later in the project once database module is provisioned.
- As the Hosted Zone is going to generate 4 nameserver (NS) records, declared the count as 4 in terraform resource cloudflare_record.
- This resource is going to read the NS records from the output list of module Hosted Zone and create the mapping records respectively on Cloudflare portal
# =============================================== #
# Hosted Zone
# Public Hosted zone for the
# sub domain ${var.r53record.sub_domain} and
# base domain ${var.r53record.base_domain}
# Allows the inbound from VPC private subnets
# =============================================== #
locals {
demo_domain = "${var.r53record.sub_domain}.${var.r53record.base_domain}"
}
module "zones" {
source = "terraform-aws-modules/route53/aws//modules/zones"
version = "~> 2.0"
zones = {
"${local.demo_domain}" = {
comment = "${local.demo_domain} (demo)"
tags = var.tags
}
}
tags = var.tags
}
# =============================================== #
# adding NS to cloudflare
# Base Domain is on CloudFlare
# This resource is going to attach the AWS NS
# entried of Hosted Zone to CloudFlare
# =============================================== #
data "cloudflare_zone" "main" {
name = var.r53record.base_domain
}
resource "cloudflare_record" "main" {
count = 4
zone_id = data.cloudflare_zone.main.id
name = var.r53record.sub_domain
value = module.zones.route53_zone_name_servers["${local.demo_domain}"][count.index]
type = "NS"
proxied = false
}
SSL Certificate
- SSL Certificate creation using AWS Certificate Manager is defined in infrstructure/acm.tf file
- Variable values are declared under r53record variable in infrastructure/.auto.tfvars file.
- Using the source module from terraform registry terraform-aws-modules/acm/aws.
- Certificate will be created for environment.basedomain and alternate domain *.environment.basedomain here environment is subdomain
- Certification validation method is DNS ie there will be validate record created under the Route53 Hosted Zone.
- Note: DNS Validation will fail if the Cloudflare NS mapping is either not completed or not success
# =============================================== #
# SSL Cert for domain
# Signed by AWS
# Validation method: Route53 DNS
# DomainName: "${var.r53record.sub_domain}.${var.r53record.base_domain}"
# SAN: "*.${var.r53record.sub_domain}.${var.r53record.base_domain}"
# =============================================== #
module "acm" {
depends_on = [ module.zones, cloudflare_record.main]
source = "terraform-aws-modules/acm/aws"
version = "~> 4.0"
domain_name = module.zones.route53_zone_name["${local.demo_domain}"]
zone_id = module.zones.route53_zone_zone_id["${local.demo_domain}"]
validation_method = "DNS"
subject_alternative_names = [
"*.${local.demo_domain}"
]
wait_for_validation = true
tags = merge({ Name = "${local.demo_domain}" },var.tags)
}
Create GitHub Workflows
GitHub Actions : Workflow Structure
To enable the GitHub Action on any repository, Yaml file must be created under .github/workflows.
In our project we have multiple yaml files which does code scans and terraform operations.
.github
└── workflows
├── checkov-check.yml
├── plan-deploy-infra.yml
├── destroy-infra.yml
├── terraform-apply.yml
├── terraform-destroy.yml
├── terraform-plan.yml
├── test-infracode.yml
├── tflint-check.yml
└── tfsec-check.yml
We have used the branching strategy (mentioned above in this article) with git operations such as Push and Pull Request to define our workflows.
- Push Request – Whenever there is any push operation to any branch in the repository other than feature/** the workflow defined under test-infracode.yml will be triggered.
- Push to feature/** branch will trigger the workflow defined in plan-deploy-infra.yml . Runs all the jobs except deploy-infra
- Pull Request – PR to demo branch from any feature/** branch will trigger all the jobs mentioned under plan-deploy-infra.yml
Code Scans
Tools such as TFLint, TFSec and Checkov are used to scan Terraform code in this project.
TFLint
- Linter tool used to check the deprecated syntax, unused declarations, proper naming conventions, best practises and possible provider specific errors such as wrong instance types, resource classes, etc.
- Definition for the linter are under .github/workflows/tflint-check.yml file
- Linter will pass to next steps in the workflow if there is only warning. Because we had set the condition of failure of the step only if it finds any error in the terraform code –minimum-failure-severity=error
name: TflintCheckTerraformCode
on: [workflow_call]
jobs:
tflint-checks:
name: Tflint Checks on Terraform Code
defaults:
run:
shell: bash
runs-on: ubuntu-latest
steps:
# Checkout Repository
- name : Check out Git Repository
uses: actions/checkout@v3
# TFLint - Terraform Check
- uses: actions/cache@v3
name: Cache plugin dir
with:
path: ~/.tflint.d/plugins
key: ${{ matrix.os }}-tflint-${{ hashFiles('.tflint.hcl') }}
- uses: terraform-linters/setup-tflint@v2
name: Setup TFLint
with:
github_token: ${{ secrets.CI_GITHUB_TOKEN }}
# Print TFLint version
- name: Show version
run: tflint --version
# Install plugins
- name: Init TFLint
run: tflint --init
# Run tflint command in each directory recursively
- name: Run TFLint
run: tflint -f compact --recursive --minimum-failure-severity=error
TFSec
- Static Analysis tool used to detect any security issues, misconfigurations based on its built-in rules.
- For example, it detects configurations such as any Database resources open to public, Security Groups of instance open to public
- Definition for the linter are under .github/workflows/tfsec-check.yml file
- TFSec Severity level are CRITICAL, HIGH, MEDIUM, LOW
- This scan reports skip/ignores all other than CRITICAL severity level ie, steps fails when there is any CRITICAL findings
- In our case we are skipping 2 rules –exclude aws-ec2-no-excessive-port-access,aws-ec2-no-public-ingress-acl because as we are using terraform registry module for VPC, which can template for public security group and all port open in network ACL
name: TfsecCheckTerraformCode
on: [workflow_call]
jobs:
tfsec-checks:
name: Tfsec Checks on Terraform Code
defaults:
run:
shell: bash
runs-on: ubuntu-latest
steps:
# Checkout Repository
- name : Check out Git Repository
uses: actions/checkout@v3
# Install tfsec cli
- name: tfsec Install
run : |
curl -s https://raw.githubusercontent.com/aquasecurity/tfsec/master/scripts/install_linux.sh | bash
# Tfsec Scan from CLI, fails only if there is any critical config mismatch else all ignored
- name: tfsec scan
run : |
tfsec --minimum-severity=CRITICAL --exclude aws-ec2-no-excessive-port-access,aws-ec2-no-public-ingress-acl
# Tfsec - Security scanner for Terraform code
- name: tfsec
uses: aquasecurity/tfsec-action@v1.0.0
with:
soft_fail: true
Checkov
- Similar to TFSec, it is also a Static Analysis tool used to detect any security issues, misconfigurations based on its built-in rules.
- Has wide use-cases for Terarform, Cloudformation, Kubernetes, Docker, Serverless etc
- Definition for the linter are under .github/workflows/checkov-check.yml file
- Report scan be skipped by using the CK Ids ie rule ids
- In our case we have used quiet and soft_fail to skip the report failures
name: CheckovScanTerraformCode
on: [workflow_call]
jobs:
tfsec-checks:
name: Checkov Scan on Terraform Code
defaults:
run:
shell: bash
runs-on: ubuntu-latest
steps:
# Checkout Repository
- name : Check out Git Repository
uses: actions/checkout@v3
# Checkov - Security scanner for Terraform code
- name: checkov
uses: bridgecrewio/checkov-action@master
with:
quiet: true
soft_fail: true
Terraform Plan : Push Request Workflow
- When user pushes the code to any branch in the repository then triggers the workflow in test-infracode.yml
- TFLint, TFSec and Checkov scans are executed
- When user pushes the code to feature/** branch then triggers the workflow in plan-deploy-infra.yml
- TFLint, TFSec and Checkov scans are executed
- After successful scans then executes the terraform plan
- At the end of the job , terraform plan will be posted in Job Summary
Terraform Apply : Pull Request Workflow
- When there is a Pull Request from any feature/** branch to demo branch then triggers the workflow in plan-deploy-infra.yml
- TFLint, TFSec and Checkov scans are executed
- After successful scans then executes the terraform plan
- At the end of the job , terraform plan will be posted in Job Summary
- As this a PR, there will additional jobs, steps for terraform apply will be executed such as
- Creates a comment in Pull Request with terraform plan summary
- Creates an issue which seeks for Manual Approval via email to approver
- Once the approver in the list, approves the issue then terraform apply will be performed
- If the Approver rejects/denies the issue then job exits
## Approval needed : this block creates GitHub issue and waits for manual approval
- name: Wait for approval
uses: trstringer/manual-approval@v1
env:
SUMMARY: "${{ steps.plan-string.outputs.summary }}"
with:
secret: ${{ secrets.GITHUB_TOKEN }}
approvers: prabhu-jumisa
minimum-approvals: 1
issue-title: "Deploying Terraform to Jumisa account"
issue-body: "Please approve or deny this deployment "
exclude-workflow-initiator-as-approver: false
additional-approved-words: ''
additional-denied-words: ''
Terraform Destroy : Manual Workflow
- Manual GitHub Workflow
- Requires a branch and initiator name a the input
- Workflow defined under terraform-destroy.yml file
- Run the terraform plan -destroy
- Creates an issue for manual approval (same as terraform apply)
- Approver gets an email, when the approver approves the issue by commenting on it, the terraform destroy will be executed.
Execute GitHub Workflows
Push Request
- When there is Push to feature branch
- Workflow Triggered, executed scans and terraform plan
- Terraform Plan on Job Summary
Pull Request
- When a PR from feature branch to demo branch
- Workflow triggered
- As it is PR , sends an email to Approver, Creates an Issue and comments the terraform plan to PR
- Terraform plan as Comment on PR
- GitHub Issue Created for review and approval
- Manual approval by adding comment as approve
- Workflow resumes to execute
- Once workflow completed
- Merge the Pull Request to demo branch
Verify AWS Resources
CleanUp
Terraform Destroy
- Connect to GitHub repository and navigate to Actions
- Choose the Destroy Infrastructure workflow
- Click on Run Workflow drop-down on the right
- Choose the branch and mention the deployer name
- Click on Run workflow
- This workflow follow the similar process as Pull Request workflow
- An email sent to Approver, An issue will be creates
- Once the approver approves the issue by commenting approve on the issue
- This workflow will run terraform destroy and cleans up the infrastructure resources created and verified above
Next Steps
Thats All for the Phase 1. Hope this article explains the clarity on base setup.
Source code on GitHub Repo
Thanks for your attention and patience to read this article. Stay tuned for the Phases implementation on the upcoming posts.
Happing reading !!! Let us learn together !!!
One Response